Beef and Guinness Chili

Share on FacebookTweet about this on TwitterPin on Pinterest


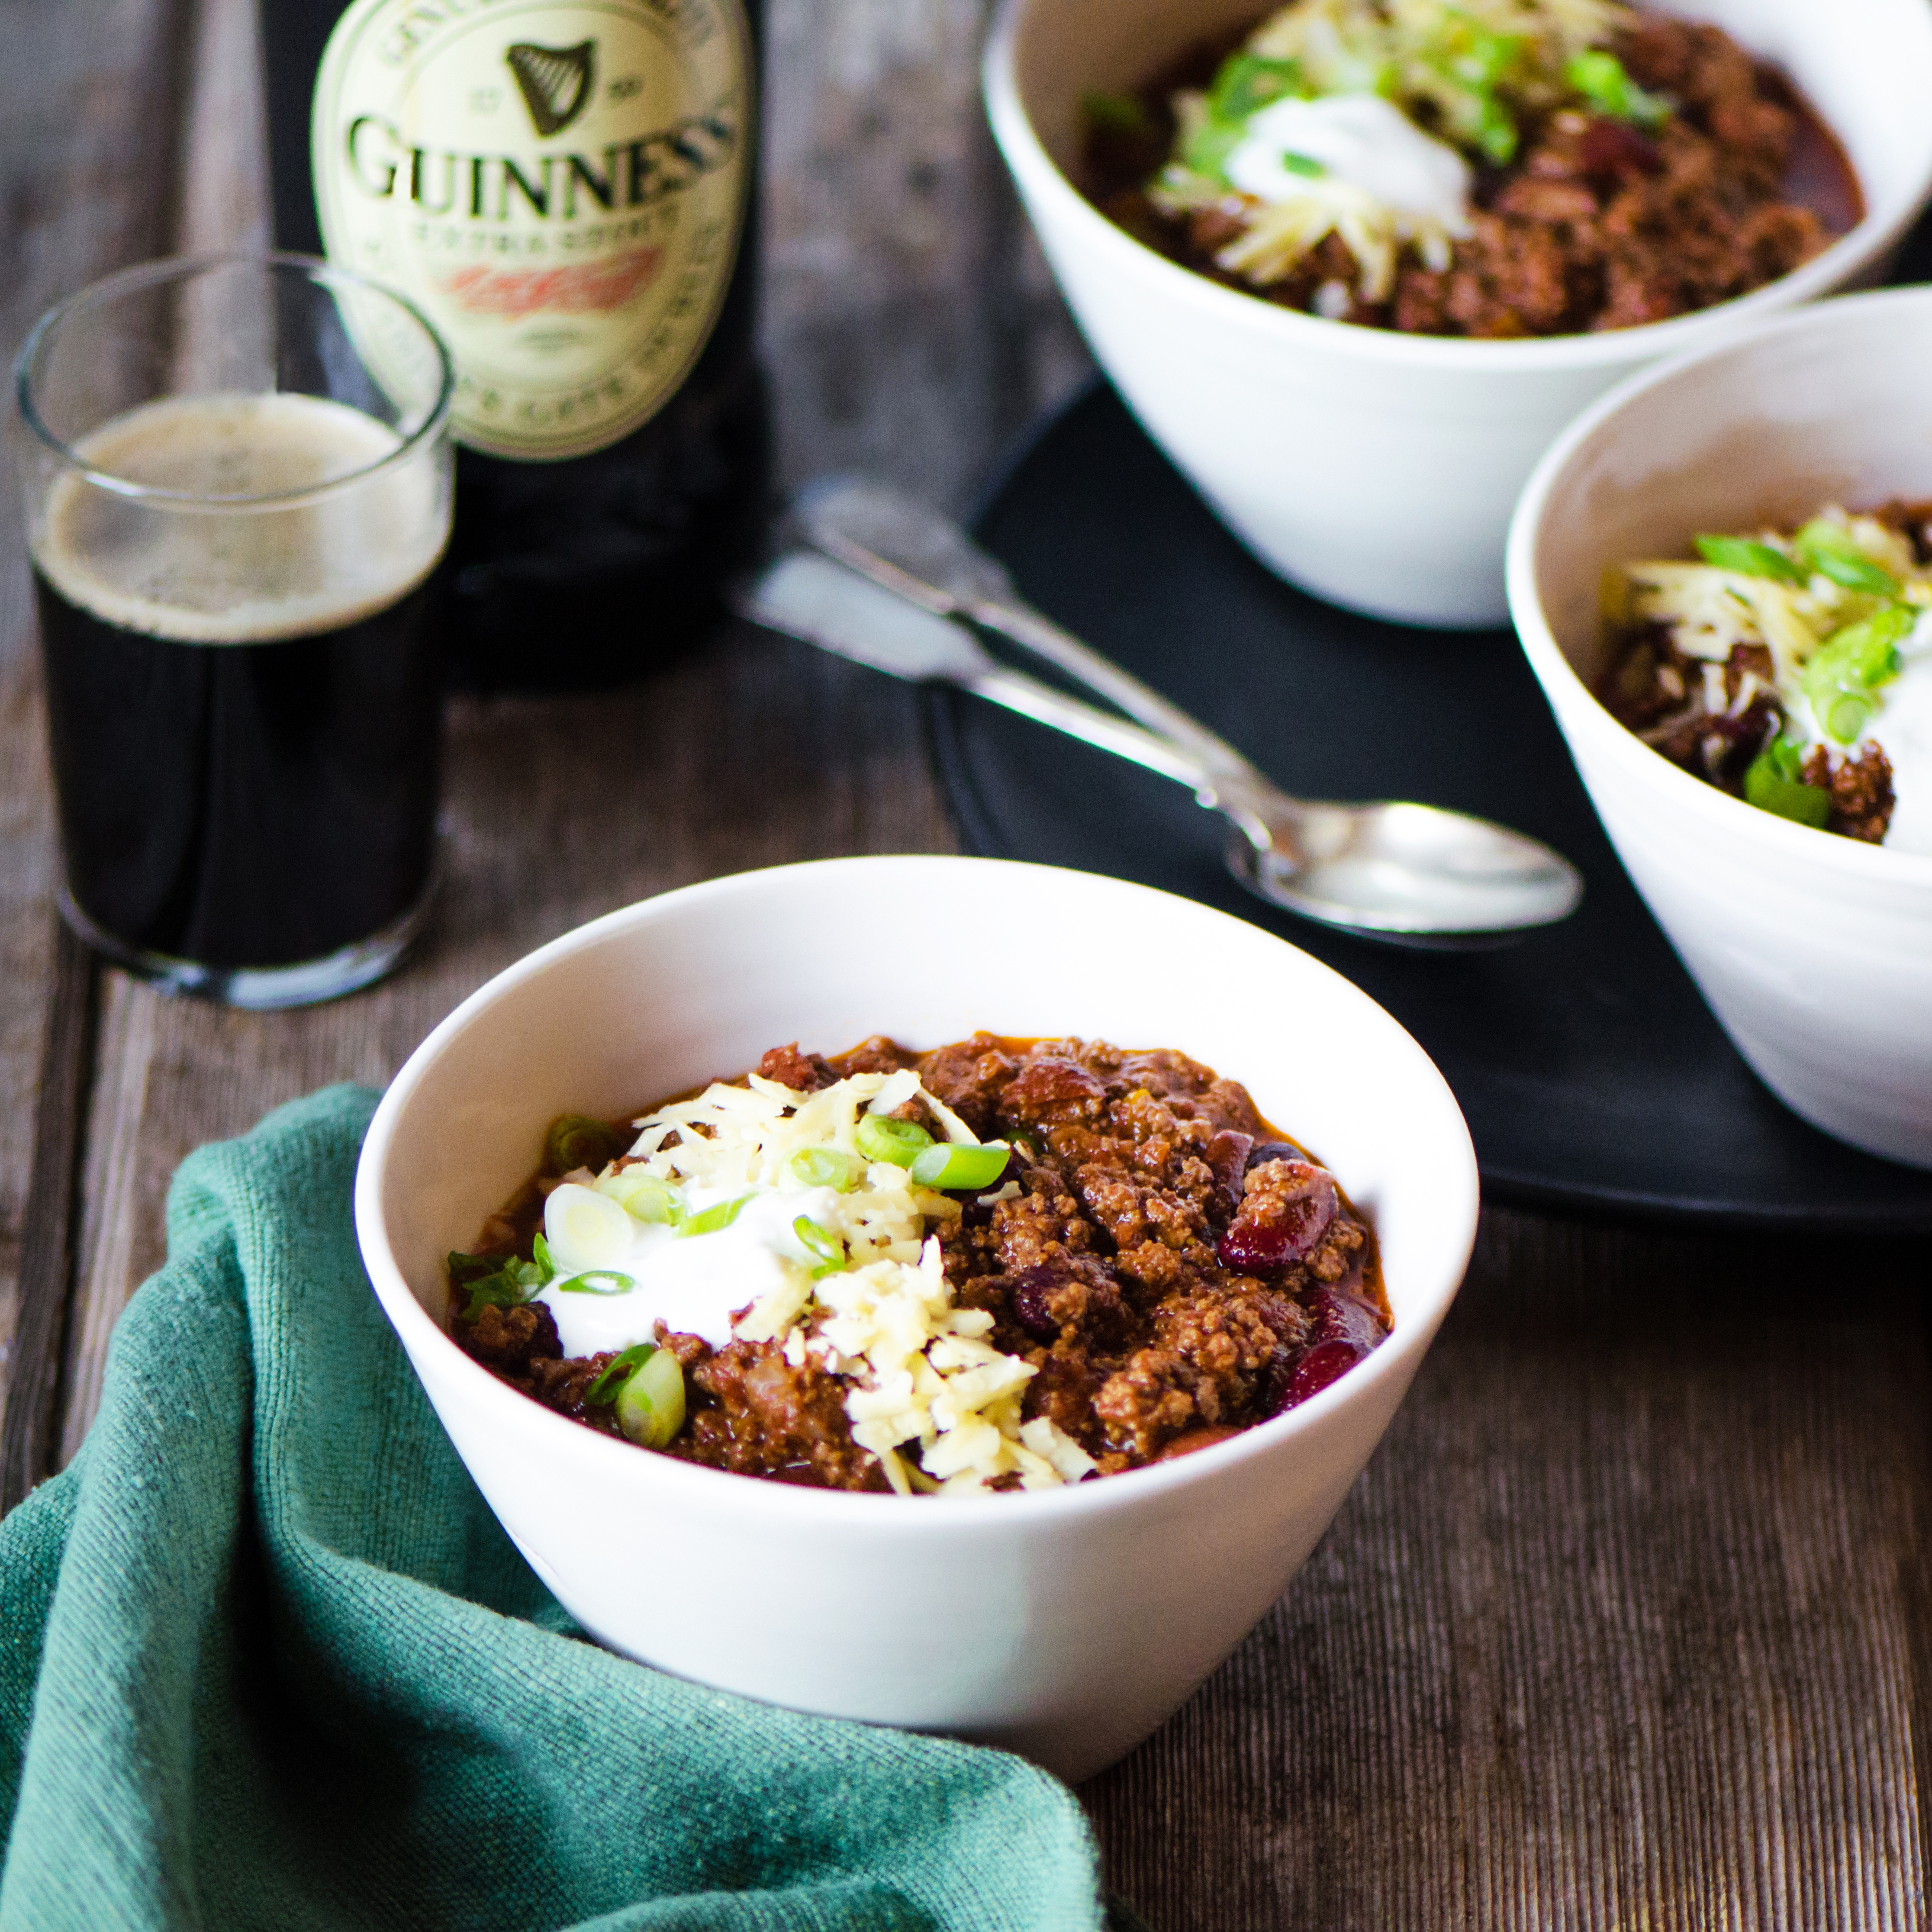
I keep being asked for a good chili recipe; a classic that I have bizarrely never tried my hand at. With St. Patrick’s Day coming up, I thought it would be fun to give it an Irish twist by adding Guinness.


Researching a recipe is one of my favorite pastimes, made all the more pleasurable since the discovery of EatYourBooks.com. The site allows you to create a virtual bookshelf of all your cookbooks with one comprehensive index. A quick search told me which of my hundreds of cookbooks contained chili recipes and then the fun began. The result of all my testing was a hugely satisfying and richly flavorful one-pot meal. Thank you to my friends who inspired this post – keep the requests coming!


Beef and Guinness Chili 

Serves 8

Ingredients:

2 tablespoons olive oil

2 onions, chopped

1 yellow pepper, chopped

1 red pepper, chopped

1 jalapeno pepper, finely chopped (remove the seeds to reduce the heat)

4 lbs coursely ground beef chuck

2 teaspoons salt

1 tablespoon ground cumin

5 tablespoons chili powder

2 teaspoons chipotle chili in adobo sauce

1 1/2 (28 ounce) cans crushed tomatoes

1 cup Guinness

2 (15 ounce) cans kidney beans, drained

For toppings: sour cream, green onions, mature Irish cheddar


Method:

1. Heat the oil in a large dutch oven, add the onions and peppers and cook on medium for approximately 5 minutes.

2. Raise the heat and add the beef, mixing with the vegetables and cooking until the meat has fully browned.

3. Add the remaining ingredients except the beans and bring to low boil. Reduce heat to low and cook for as long as you can – at least 3 hours (this recipe is like a bolognese, the longer you cook it, the better it gets. You could definitely do in a crock pot but need to sauté the vegetables and brown the meat first). Skim the fat and discard as you go, stirring occasionally through the cooking process.

4. Add beans 5 minutes before you’re finished and heat through.

5. Serve with your favorite toppings – I like the classic sour cream, green onions and Irish cheddar.

Hamantaschen

Share on FacebookTweet about this on TwitterPin on Pinterest


This week Aurora takes over the blog to share a classic hamantaschen recipe for Purim as well as a little lesson on the holiday.


It’s almost Purim, a Jewish holiday celebrating the salvation of the Jewish people in ancient Persia from the Prime Minister Haman’s plot to eradicate them. Queen Esther turned the tables on Haman thus saving her people.


Today the holiday is celebrated with costumes (many little girls dress as Queen Esther), noisemakers (to drown out the sound of Haman’s name), drinking and these delicious hamantaschen cookies. Hamantaschen in Yiddish means “Haman’s Pockets” and they have three sides much like Haman’s three-cornered hat. The cookies are often filled with poppy seeds but here we took the liberty of filling with Friend in Cheese’s delectable jams. We hope you enjoy them and have a joyous and fun Purim whether you dress up and celebrate or simply want to try a taste of another culture!


Hamantaschen

Makes 18 cookies

Ingredients:

2 cups of flour

1 teaspoon baking powder

1/4 teaspoon kosher salt

1 egg plus 1 egg yolk

1/3 cup vegetable oil

Zest of 1 lemon

2 teaspoons fresh lemon juice

2 tablespoons orange juice

1 tablespoon brandy

Lavender Plum Jelly

Forbidden Fruit Marmalade

1 egg, beaten


Method:

1. In a medium bowl mix flour, baking powder and salt then set aside.

2. In a large bowl beat eggs with yolk then add oil, zest, juices and brandy. Mix until smooth with a wire whisk.

3. Slowly stir the flour mix into the egg mixture until a sticky batter is formed. Cover the batter in plastic wrap and refrigerate from 1 hour to overnight.

4. When ready to bake cookies, preheat the oven to 375F.

5. Divide the dough in two and roll one ball out on a lightly floured surface to 1/4 inch thick. Cut the dough with a biscuit cutter or a cup that is 4 inches in diameter.

6. Spoon a teaspoon of jam in the center of each cookie. Then fold up the sides of the circle to create the triangular shape of the hamantaschen. Pinch along the seams as you go to make sure they are secure. Repeat with remaining dough, alternating between jams.

7. Transfer finished hamantaschen onto 2 baking sheets. Brush all the sides with the beaten egg and then bake in the center of the oven for 10-15 minutes until browned on all sides.

8. Allow to cool and then eat immediately or store for up to 4 days in an airtight container.

Skillet Strata

Share on FacebookTweet about this on TwitterPin on Pinterest


A few months ago, some friends organized a brunch for their niece who would soon be graduating from college. They invited friends from various industries, from fashion to publishing, giving each of them some time to talk about their work. I thought it was a fantastic idea for anyone preparing to leave the relative cocoon of education for the ‘real world’. As if we needed convincing to spend time with this incredible couple and their charming niece, we were given the most spectacular brunch as well. By far the highlight of which for me was this Strata. Pancetta makes any dish delicious but combined here with leeks and cremini mushrooms, the result was an incredibly savory breakfast bake that easily fed a crowd. A recipe I know I’ll be making again and again.


Skillet Strata

Serves 4

Ingredients:

1 baguette, sliced into 1 inch cubes

1 tablespoon olive oil

5 ounces pancetta, cubed

2 leeks, trimmed, sliced lengthwise and then thinly sliced

4 cremini mushrooms, sliced

1 teaspoon fresh thyme leaves

4 large eggs plus 1 egg yolk

1 cup heavy cream

1/2 cup whole milk

3 cups grated gruyere, divided

4 ounces goat cheese, crumbled


Method: 

1. Preheat the oven to 350°F degrees. Lay the diced baguette on a sheet pan and toast for 10 minutes, turning half way through baking. Keep the oven on after it has finished toasting.

2. In a large skillet, heat the olive oil and fry the pancetta until browned, about 5-10 minutes. Remove to drain on a paper towel lined plate.

3. Discard all but one tablespoon of the fat and add the leeks to the pan. Cook on medium heat for 10-15 minutes until soft. Add the mushrooms and thyme and cook for a further 2 minutes.

4. In a bowl, mix together the eggs, yolk, cream and milk until well blended.

5. In a 9 inch ovenproof skillet, toss together the toasted bread cubes, pancetta, leeks, mushrooms, thyme and 2 cups of the gruyere. Lastly, gently stir in the goat cheese.

6. Pour the eggs over the bread mixture and sprinkle with the remaining gruyere.

7. Bake in the oven for 30-40 minutes. The strata is done once the center bounces back when tested

Shrikhand (Saffron Yogurt)

Share on FacebookTweet about this on TwitterPin on Pinterest


Shrikhand or Saffron Yoghurt is a perfect way to end an Indian meal. A light and delicious dessert from Gujarat, its vivid color and flavor comes from the gorgeous saffron. Wonderfully creamy and cooling after a meal filled with spices, it is finished off with nuts to add a little crunch.


Shrikhand by Masala Mama

Published from Recipes from Many Kitchens

Ingredients:

2 cups (500g) Greek-style yoghurt

1 tablespoon (15ml) milk

½ teaspoon saffron threads

½ cup (96g) granulated sugar

¼ teaspoon freshly ground green cardamom seeds, or to taste

For garnish: 

2 tablespoons (21g) chopped unsalted pistachios

2 tablespoons (21g) flaked or sliced almonds (optional)

Some saffron strands


Method:

1. Line a large sieve with muslin cloth. Place a bowl under the sieve and transfer the yoghurt on to the cloth. Cover and let it sit in the fridge for about 5-6 hours.

2. Heat the milk in a small pan or microwave. In a small bowl mix the saffron with the warm milk. Allow the saffron to infuse the milk for about ten minutes using the back of a spoon to crush the saffron further into the milk.

3. Remove the yoghurt from the fridge (the liquid in the bowl below can be discarded). Sift the sugar into the thickened yoghurt, then add the saffron milk and ground cardamom. Cover and chill in the fridge.

4. Garnish with nuts and a few strands of saffron and serve cold in glasses or small saucers.

A Thank You

Share on FacebookTweet about this on TwitterPin on Pinterest


When I first started Many Kitchens, I was very clear that my aim was to find the best cuisine from all around the globe being made in the United States. In order to have enough diversity as an online marketplace, I actively searched for exotic foods and immigrant producers who could create them most authentically. Today, Many Kitchens works with artisans who have come to America from all over the world and our tables are so much richer for them. I can’t imagine how bland our lives would be without gastronomic diversity or what that would even look like? No delicate saffron, no complex Zaatar, no fiery curries?


Last week, I met with the indefatigable, passionate, talented and utterly stunning (inside and out) Hawa Hassan. Immigration is on the forefront of all our minds but especially hers. Like me, she’s an immigrant but unlike me, she was born in Somalia. I can’t even begin to understand the challenges she has faced and is now being faced with again. Just before we parted, Hawa encapsulated what I have been struggling to say in one beautifully eloquent sentence, “Food is a passport.” Her addictive and versatile Somali sauces were an entirely new discovery for me and a reminder of how much of the world I have yet to discover.


It is thanks to Hawa and others like her, that we get to travel the globe without ever having to leave our kitchens. So in lieu of a recipe this week, I’d like to take a moment to express my gratitude to all our producers, whether they be immigrants or descendants of immigrants, for enriching our palates and ensuring that our community is so much more than the sum of its parts.


Mocha Chocolate Mousse

Share on FacebookTweet about this on TwitterPin on Pinterest


This recipe is adapted from one of my favorite cookbooks and indeed blogs; What Katie Ate. More like pots de Crème than a mousse, a little goes a very long way with these decadently rich and fudgy desserts. I served them in espresso cups for that very reason and to give a nod to the coffee flavor that makes them so distinctive. There’s a bit more work involved than your average chocolate mousse but it’s definitely worth it. With the added benefit of needing to be made in advance, they’re a great way to end any dinner party, not just Valentine’s Day.


Mocha Chocolate Mousse

Serves 6-8

Ingredients:

7 oz. dark chocolate (broken into pieces)

6 oz. unsalted butter

2 tablespoons espresso (or strongly brewed coffee)

4 large eggs, separated

2/3 cup superfine sugar

1/8 teaspoon salt

1/2 teaspoon vanilla extract

Whipped cream and chocolate shavings for garnish


Method:

1. Find a heatproof bowl that fits snugly into a saucepan. Add enough water to the saucepan so it comes just below the bottom of the bowl and bring to a simmer. Melt the chocolate, butter and coffee together in the bowl stirring regularly. Remove bowl and set aside but keep the water simmering.

2. Add some ice cubes and water to a large bowl and set aside.

3. Sit another heatproof bowl over the simmering water and add the four egg yolks, sugar and 1 tablespoon of cold water. Whisk for about 3 minutes until it has thickened and become paler. Remove from the heat and place in the bowl of iced water. Continue to whisk for a further 5 minutes or until thickened and cooled slightly. Be careful not to get any water from the bowl into the egg mixture.

4. Add the chocolate mixture to the egg mixture and combine well.

5. Whisk the egg whites with a pinch of salt until beginning to peak. Slowly add the egg whites to the chocolate mixture, folding in gently until they are all combined.

6. Transfer the mixture to a jug with a spout for easier pouring and distribute among espresso cups or martini glasses. Chill for at least 3 hours in the fridge and serve topped with whipped cream and shavings of chocolate.

Shrimp and Scallion Shumai

Share on FacebookTweet about this on TwitterPin on Pinterest


When the woman outside NYC’s hottest new Dim Sum place, Tim Ho Wan, told us the wait would be 3 hours, I actually thought she was joking. Going for Dim Sum on a weekend is one of the joys of living in the city but nothing is worth waiting 3 hours for! Learning to make my favorite dishes at home has been a goal of mine and I’m always surprised at how simple it is. We added just a teaspoon of One Culture’s Southwest Asian Sweet Chili sauce to the filling and I couldn’t believe the extra flavor it gave each dumpling. Give them a try for Chinese New Year!


Shrimp and Scallion Shumai

Makes about 24 

Ingredients:

1 clove garlic, minced

1 tablespoon minced ginger

1 lb. uncooked shrimp

2 tablespoons soy sauce

1/3 cup roughly chopped scallion whites, chop the greens for garnish

1 tablespoon rice wine vinegar

1 tablespoon sesame oil

1/2 teaspoon Southwest Asian Sweet Chili plus more for dipping

1 package of wonton wrappers (found in the freezer section at Asian supermarkets)

Savoy cabbage for lining the steamer basket


Method:

1. In a food processor, puree garlic, ginger, half of the shrimp, soy sauce and scallions until it forms a smooth paste.

2. Dice the remaining shrimp and combine in a bowl with the paste.  Mix in the rice wine vinegar and sesame oil.

3. Line a baking tray with parchment paper and fill a small finger bowl with water.

4. To assemble the shumai, fill each wrapper with a dessert spoon of shrimp filling. Bring the sides of the wonton wrapper to the center, pleating them together as you go and pressing to the filling until the sides come together. The shrimp mixture should peak out of the top. Flatten the shrimp top and repeat until filling is used up.

5. Freeze or refrigerate shumai for 1 hour.

6. When ready to cook, steam in a cabbage lined steamer basket for  8-10 minutes until the exposed filling turns pink and the wonton wrappers are tender.

7. Serve shumai with extra Southwest Asian Sweet Chili sauce for dipping.

Mushroom and Lentil Soup

Share on FacebookTweet about this on TwitterPin on Pinterest


It’s been a relatively healthy beginning to 2017. Despite the odd hiccup, (Saturday’s birthday celebration for my friend Dwight included a stick of butter per person to ensure the Louisiana shrimp was authentic) I’ve been pretty well behaved. Making a big batch of this incredibly satisfying and unintentionally vegan soup has been the largest contributor to my restraint. It has also been especially comforting to have a steaming bowl of soup after walking Daisy in these frigid temperatures. It’s hearty, healthy, and very very tasty!


Mushroom and Lentil Soup

Serves 4

Ingredients:

2 tablespoons olive oil

2 small onions, peeled and diced

2 large cloves garlic, peeled and smashed

1 large dried chili (any mild dried chili works)

5 oz. mushrooms, sliced (I used a mixture)

4 oz. small brown lentils (I used Puy lentils), rinsed

4 cups vegetable stock

3 sprigs of thyme

Cognac

1 lemon

Good French bread for dipping


Method:

1. Heat the olive oil in a medium saucepan and add the onions. Cook on medium until soft, about 5-8 minutes. Save some of the browned mushrooms to a separate plate for garnish.

2. Add the garlic and chili and cook for a further minute or two, stirring regularly, before adding the mushrooms and cooking for a further 5 minutes.

3. Add the lentils, pour in the stock and bring to the boil. Once boiling, reduce to a low simmer with a lid almost covering the pot for about 30 minutes or until the lentils are soft. 

4. Season with salt, pepper, a dash of cognac and the juice of a lemon.

5. Remove the garlic, chili and thyme and then whizz using a hand held blender till about half of the soup is pureed but you still have plenty of texture. 

6. Serve warm with browned mushrooms as a topping and extra bread for dipping.


Spaghetti alla Carbonara

Share on FacebookTweet about this on TwitterPin on Pinterest


It’s slightly funny that National Spaghetti Day falls so close to New Years. So much for those resolutions. I find it a physical impossibility to see Spaghetti alla Carbonara on a menu and not order it even though I’m usually disappointed. My inability to resist has reached all corners of the world and is well documented on Instagram. Common sense would tell most people that a misspelt listing of Spagetee Corbonera on a laminated menu on the rooftop of a backpacker hostel in India is not the wisest choice but still I can’t say no. My search for the holy grail of Carbonaras is never ending. The best in New York is in my opinion at Barbuto and I have a near toddler temper tantrum when they aren’t serving it. My biggest piece of advice when making Carbonara is don’t make it for a crowd. It needs to be eaten immediately and if you’re serving more than three, the first person’s plate is already past its best by the time you’ve served the third. I’ve revised my version to be more authentic (I’m ashamed I used to add cream). Enjoy wholeheartedly – resolutions be damned!


Spaghetti alla Carbonara

Serves 2

Ingredients

½ lb Spaghetti (preferably De Cecco)
3 oz cubed pancetta
3 egg yolks
½ cup of grated Parmesan cheese


Method

1. Start boiling water in a large pot and add a good handful of rock salt.
2. In a bowl whisk together the egg yolks and Parmesan cheese.
3. When the water is boiling, add the spaghetti and cook according to the packet.
4. Meanwhile fry the pancetta in a little olive oil until crisp and add freshly ground pepper to taste.
5. Before draining the pasta, reserve 2 cups of the salty water and set aside.
6. Drain the pasta well and add directly to the frying pan with the pancetta.
7. Turn off the heat, mix in 1/2 cup of the salty water and mix well. Then add the egg mixture and stir vigorously until you have a creamy consistency.
8.Serve immediately with extra Parmesan.


Don’t Worry Bee Happy

Share on FacebookTweet about this on TwitterPin on Pinterest


Claire of Catskill Provisions makes this cocktail with her extraordinary honey infused rye whiskey. Just add ½ teaspoon of honey in case you can’t find a bottle. Of course, I also used her raw honey and her Grade A maple syrup in this recipe, both of which I’m never without. Actually I’m never without her honey whiskey either but I need to slow down on my intake of that particular product! One of the guiding philosophies behind Catskill Provisions is to bring business to areas of New York State that really need it. Every stage of every product, from the growing of the wheat to the jarring of the honey is all done in New York State. She epitomizes the local food movement.


Don’t Worry Bee Happy 

From Recipes from Many Kitchens

Makes 1-2 drinks

Ingredients:
2 ounces (60ml) rye whiskey
1 ounce (30ml) St. Germain elderflower liqueur
2 tablespoons (30ml) of lemon juice
½ teaspoon honey
1 dash of maple syrup
Lemon rind for garnish


Method:
Mix all ingredients in a shaker and serve in an up-glass or over ice. Garnish with a slice of lemon. You can multiply the amounts and serve from a large pitcher if you’re making for a party.