Asparagus alla Parmigiana


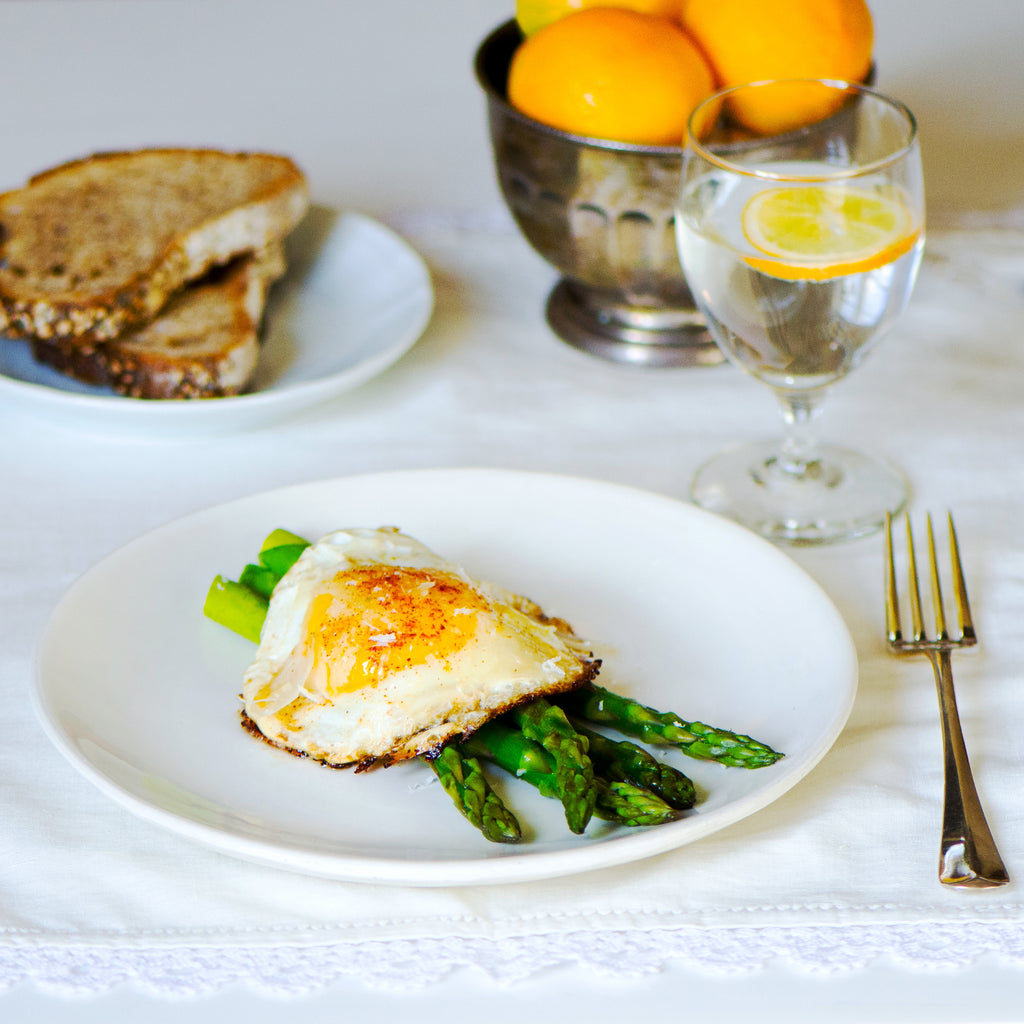
For me, one of the definitive signs that Spring has finally arrived is the bounty of fresh asparagus at farmers’ markets and restaurants across NYC. My favorite way to eat it is the way my mother always made them for me with fried eggs so that I can dunk the tips into the yolk.


Planning this post for Mother’s Day reminded me of a story she used to tell me. In the spring of 1970, she visited her favorite restaurant in London, the famed but no longer existent Grill at The Connaught hotel. The Maitre D’, also an Italian, let her know that they had just got in the first asparagus of the season and she asked if the chef would do them ‘alla Parmigiana’. Being a regular and heavily pregnant with my brother, the chef agreed to accommodate her unusual request.


Soon four waiters appeared, each carrying trays, the contents of which were concealed under large silver domes. With great theatrics, the waiters lifted the domes simultaneously to reveal four dishes; one with the steamed asparagus, one with the fried eggs, one with the browned butter and the last with the grated Parmesan cheese. At this point all the other tables were craning their necks and asking if they can have the same and lore has it, that from that day on, Asparagus alla Parmigiana became a regular dish at The Connaught.


Asparagus alla Parmigiana

Serves 2

Ingredients:

1/2 lb asparagus, trimmed

3 tablespoons butter

2 large eggs

Freshly grated Parmesan cheese

Ancho Chile Salt

Freshly ground pepper


Method:

1. Bring a large pot of water to a boil and cover with a bamboo steamer. Lay the asparagus flat in the steamer, cover and cook for 4-5 minutes – asparagus should be tender but still crisp.

2. In a large frying pan, heat the butter on high until it begins to foam then carefully crack the eggs into the hot butter. Once the eggs have begun to set, tip the pan and baste the eggs with the hot butter using a spoon. I like the edges of the egg white to get nice and brown.

3. Divide the asparagus between 2 plates, cover each with a fried egg and some of the browned butter. Top with grated Parmesan cheese and season with salt and pepper. Serve immediately.


Skillet Strata


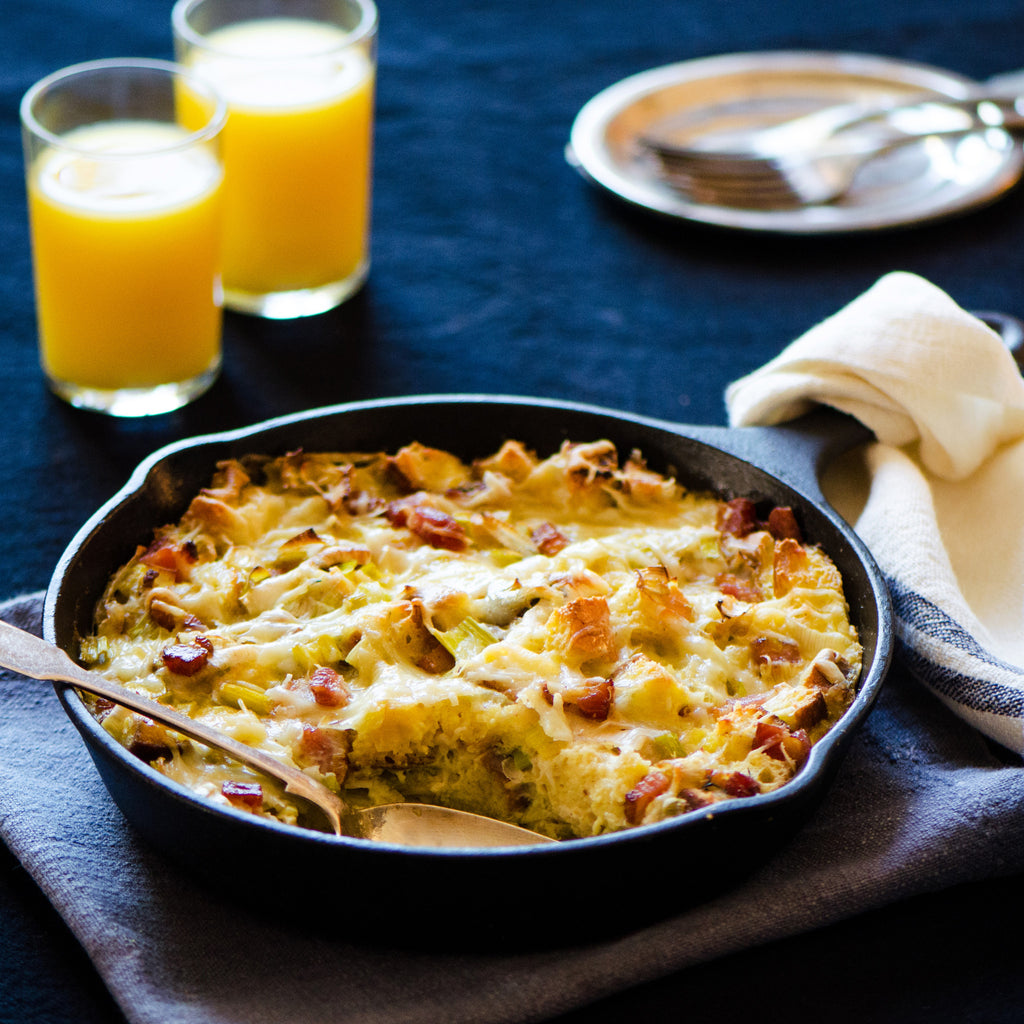
A few months ago, some friends organized a brunch for their niece who would soon be graduating from college. They invited friends from various industries, from fashion to publishing, giving each of them some time to talk about their work. I thought it was a fantastic idea for anyone preparing to leave the relative cocoon of education for the ‘real world’. As if we needed convincing to spend time with this incredible couple and their charming niece, we were given the most spectacular brunch as well. By far the highlight of which for me was this Strata. Pancetta makes any dish delicious but combined here with leeks and cremini mushrooms, the result was an incredibly savory breakfast bake that easily fed a crowd. A recipe I know I’ll be making again and again.


Skillet Strata

Serves 4

Ingredients:

1 baguette, sliced into 1 inch cubes

1 tablespoon olive oil

5 ounces pancetta, cubed

2 leeks, trimmed, sliced lengthwise and then thinly sliced

4 cremini mushrooms, sliced

1 teaspoon fresh thyme leaves

4 large eggs plus 1 egg yolk

1 cup heavy cream

1/2 cup whole milk

3 cups grated gruyere, divided

4 ounces goat cheese, crumbled


Method: 

1. Preheat the oven to 350°F degrees. Lay the diced baguette on a sheet pan and toast for 10 minutes, turning half way through baking. Keep the oven on after it has finished toasting.

2. In a large skillet, heat the olive oil and fry the pancetta until browned, about 5-10 minutes. Remove to drain on a paper towel lined plate.

3. Discard all but one tablespoon of the fat and add the leeks to the pan. Cook on medium heat for 10-15 minutes until soft. Add the mushrooms and thyme and cook for a further 2 minutes.

4. In a bowl, mix together the eggs, yolk, cream and milk until well blended.

5. In a 9 inch ovenproof skillet, toss together the toasted bread cubes, pancetta, leeks, mushrooms, thyme and 2 cups of the gruyere. Lastly, gently stir in the goat cheese.

6. Pour the eggs over the bread mixture and sprinkle with the remaining gruyere.

7. Bake in the oven for 30-40 minutes. The strata is done once the center bounces back when tested

Matzo Ball Soup


Often called Jewish Penicillin, Matzo Ball Soup is not only a Passover staple but also such a New York  City staple. This recipe was taught to me by my wonderful friend Rachel who swears the secret lies in the dill and the richness of the broth. We’ve made this recipe together for Seder meals and other holidays and it is just delicious and always makes me feel right at home.


The stock can be made in advance to save time. You can freeze your enriched chicken stock or simply make several days in advance and rewarm when ready to serve. Always store your matzo balls separately so they do not become engorged with water and break apart.


Matzo Ball Soup
Ingredients:
1 whole chicken, giblets removed (about 4lbs)
1 yellow onion
1 bunch dill, stems removed then chopped
4 eggs
1/4 cup vegetable oil
1 cup matzo meal (make sure it’s kosher for Passover)
1 (32 oz) carton chicken stock
4 large carrots, cut into bite size pieces
Salt and freshly ground pepper


Method:
1. In a large stockpot, add whole chicken and cover with water. Bring to a boil then reduce to a simmer. Simmer uncovered for one hour.
2. Meanwhile, slice onion in half and dice one half. Set aside in a small bowl for the soup. Take 1/2 of the remaining onion and mince. Set aside for the matzo balls.
3. In a medium bowl, mix egg, vegetable oil and 1/4 cup water. Mix thoroughly then add in matzo meal and mix till smooth. Add in the minced onion, 1/3 of the chopped dill and season with salt and pepper. Mix well then set in the refrigerator for 1/2 hour.
4. Once chicken stock has simmered for an hour, remove chicken to cool into a large bowl. Take your stockpot and place In the freezer.
5. After the fat has chilled on the surface of the stock, skim it off with a spoon and return stock to the stovetop. Add in the carton of chicken stock.
6. Fill another large pot halfway with salted water. Be sure that you have a lid for the pot.
7. Now that chicken has cooled, remove fat and discard. Shred the meat and set aside for the soup. You can save the bones to make another stock later but be sure to at least save one leg bone for your Seder plate.
7. Your matzo balls are ready to be formed! Take a large spoon of batter and roll into a ball. Drop into the pot of boiling salted water. Repeat till you’ve used all your batter. You get extra points if you manage to make an even 18 balls (the number 18 for Jews is a spiritual number that symbolizes the word “chai” meaning life.)
8. Lower boiling water to a simmer and cover and cook matzo for 30 minutes.
9. As your matzo balls are cooking, return your chicken stock to a boil and add in chopped carrots. Cook till just soft (about 10 minutes). Reduce heat again to a simmer and add in chopped onion and remaining dill. Season to taste with salt and pepper.
10. You can move your cooked matzo balls to the soup and serve immediately or store them separately if you are making in advance.
11. Be sure when you serve to ask how many matzo balls your guests want and serve your broth piping hot. Enjoy!

Sunday Standing Rib Roast


This is the perfect roast to share with a large gathering. Porter & York are known for the exceptional quality of their fresh meats and their Rib Roast stands alone. Perfect as a main course for the holidays this roast makes not only a beautiful presentation but also a deliciously rich feast. Most of the cook time is in the oven so with relatively little prep, you will have the perfect meal for the holidays. We hope you enjoy!


Sunday Standing Prime Rib Roast

Serves 10-12

Prep time: 10 minutes

Cook time: 4-5 hours


Ingredients:

8-10 pounds standing Prime Rib Roast, bone-in

About ½ cup kosher salt (1 teaspoon per pound of meat)

About ¼ cup fresh ground black pepper (1/2 teaspoon per pound of meat)


Directions:

1. 24-48 hours before you plan to serve the roast, rub it all over with salt and fresh ground pepper. Add fresh or dried herbs if you wish. This dry brining time creates a more well-seasoned flavor. Remove the meat from the refrigerator an hour before cooking.
2. Preheat the oven to 250° F.

3. Roast for about 25 minutes per pound of meat. Check the temperature 30 minutes early. You want 130° F for medium rare. Remove roast and let rest for 45-60 minutes.

4. Increase oven temperature to 500° F. Roast for 10 minutes to ensure the deeply golden crusty exterior and a juicy reddish pink interior.

5. Remove from oven and, since the meat is already well rested, simply carve and enjoy!

Hanukkah Donuts (Sufganiyot)


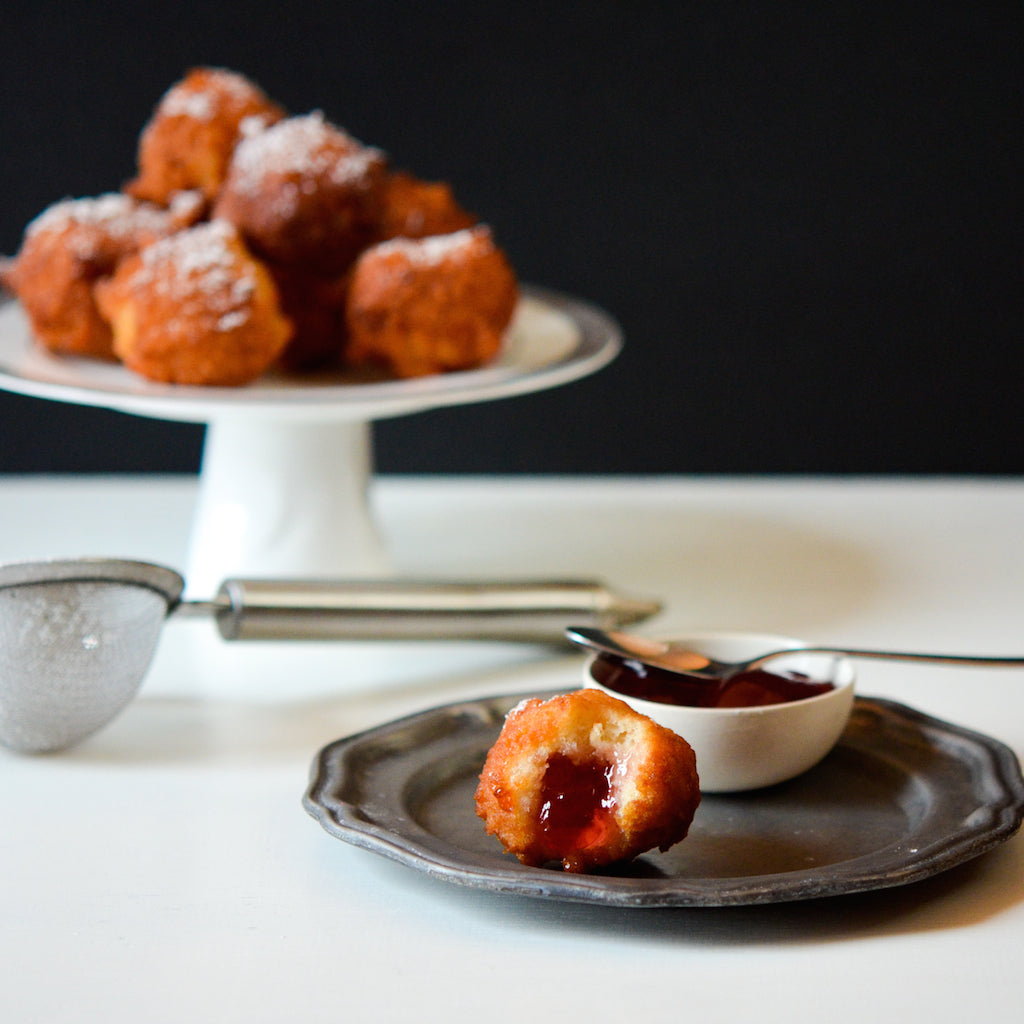
Who doesn’t love fried foods and what better way to enjoy than an entire holiday devoted to them! These donuts, or sufganiyot as they are often called (though don’t ask me how to pronounce that), are a delicious addition to a Hanukkah feast. The recipe is simple and once you get your frying temperature right you’ll be done in a flash. Then comes the fun part of deciding what to fill them with. We work with so many wonderful makers of homemade caramel sauces, jellies, jams and fudges that we went wild. The result was a delicious smorgasbord of sweets that were still hot from the frying with crunchy outsides and fluffy, rich insides. It was as fun making them as eating them so this recipe is great to get family or friends involved. We hope you enjoy as much as we did!


Hanukkah Donuts (Sufganiyot)

Adapted from Quick & Kosher by Jamie Geller

Makes about 14 donuts

Ingredients:

2 1/2 cups self-rising flour

2 (8-ounce) cartons Greek yogurt

2 tablespoons sugar

2 tablespoons honey

1 teaspoon vanilla extract

1/2 teaspoon ground cinnamon

2 eggs

6 cups canola oil

3/4 cup confectioners’ sugar (for dusting)


Filling:

Fleur de Sel Caramel Sauce

Fudge Sauce

Afternoon Strawberry Jam

Strawberry Jalapeño Jam


Method:

1. In a large bowl, mix flour, yogurt, sugar, honey, vanilla, cinnamon and eggs. Knead mixture until thoroughly combined and a sticky, doughy batter is formed.

2. Cover with a kitchen towel and let it rest for 20 minutes.

3. Meanwhile, Heat 6 cups canola oil in a 6-quart stockpot, over medium heat.

4. When dough is ready, test oil by dropping in 1 tablespoon of batter (ideally you want to be able to cook the donut 1 minute per side and have it be a golden brown color. If it darkens too quick or can’t last a minute per side then your oil is too hot. Allow it to cool before you do another test. Similarly if the batter stays a pale tan and doesn’t turn golden in a minutes time, your oil is too cool- turn up the heat and test again in 5 minutes).

5. To fry donuts, scoop out a tablespoonful of batter and drop in oil. (Don’t make the doughnuts too big, so they can cook through.)

6. Once your oil is the correct temperature, you should be able to fry about 7 doughnuts at a time. Using a slotted spoon, turn doughnuts when halfway browned, about 30 seconds to 1 minute.

7. Fry for another 2-3 minutes or until entire doughnut is deep golden brown and cooked through.

8. Remove doughnuts and let cool on paper towel-lined plates.

9. Repeat with remaining batter.

10. Fill a squeeze bottle with your desired filling and inject a little into each doughnut. Roll each doughnut in confectioner’s sugar. Serve up to your guests!


Cranberry Marmalade Sauce


This sauce is a vibrant addition to your Thanksgiving spread and is the simplest side to throw together. By using marmalade instead of zest you not only produce an utterly delicious dish but you also save yourself the time of zesting all that citrus. This sauce also makes a killer sandwich spread for post-Thanksgiving turkey sandwiches.


Cranberry Marmalade Sauce

Ingredients:

1 apple (Honey Crisp, Fuji or Gala all work great)

12 oz bag fresh cranberries

1 orange, juiced (makes about 1/2 cup juice)

1 jar English Breakfast Marmalade

1 cup water

3 cinnamon sticks

1/4 teaspoon sea salt

2 tablespoons brown sugar


Method:

1. Chop the apple into 1/4 inch chunks and combine with fresh cranberries in a medium-sized saucepan.

2. Squeeze the orange juice into pan and add marmalade and remaining ingredients and bring to a boil.

3. Reduce to a simmer and partially cover for 10 minutes, stirring from once or twice while cooking.

4. Remove lid and heat for 10 minutes on medium-low, stirring with a wooden spoon and mashing the apple and cranberry pieces as the sauce thickens.

5. Remove the saucepan from heat and allow to cool. Serve at room temperature and be sure to remove the cinnamon sticks before placing on the table. You can make this sauce in advance.

Harvest Bread Stuffing with Chorizo


I have been fighting a losing battle since moving to America 14 years ago. Every year at Thanksgiving, I insist on making what I consider to be stuffing. It’s completely different from stuffing in America in that it’s mainly meat based with very little bread at all – just a few breadcrumbs for binding. I try to convert someone each year and I actually caught a few young’uns early before they were corrupted to the ways of American stuffing. My first American Thanksgiving, I even tried to introduce bread sauce to the table but as I looked at it through new eyes, I realized that, like marmite, unless you grew up with it, you were never going to be convinced it was anything other than disgusting. My stubborness has kept me from trying all the myriads of American stuffing that are laid out each year at the annual banquet that I’m lucky enough to attend.


Aurora convinced me to put aside my pig headedness and create a stuffing with Nashoba Bakery’s Harvest Bread which screams Thanksgiving with its cranberries and pecans. We added just enough of Schaller & Weber’s Chorizo to satisfy my meat cravings and out of the oven came a stuffing that was so delicious that I ate it on its own for dinner. It still has a gentle nod to my roots across the pond but has its feet firmly placed in America and may very well have finally converted me.


Harvest Stuffing with Chorizo

8 Servings

Ingredients:

1 loaf of Harvest Bread (crust removed, cut to small cubes)

1 stick unsalted butter, plus extra for buttering baking dish

1 large onion, diced

3 leeks, thoroughly cleaned (sliced into half moons)

3 celery stalks, diced

1 large fennel bulb, diced

Salt and freshly ground pepper to taste

2 tablespoons minced fresh rosemary

2 tablespoons minced fresh sage

2 chorizo sausages, casing removed and sliced

2 1/2 cups chicken stock

2 eggs

3/4 cup chopped fresh flat leaf parsley


Method:

1. Preheat the oven to 350° F. Butter a baking pan or casserole dish. Toast bread in the oven for 10 minutes until just crisp. Allow to cool.

2. In a large cast iron pan, melt butter and add in onion, leeks, celery and fennel. Season with salt and pepper and cook until slightly golden (about 12-14 minutes).

3. Stir the fresh rosemary and sage into the onion mixture.

4. Remove the onion mixture to the side in a large bowl and add the chorizo to the cast iron pan. Cook the chorizo until browned (about 5 minutes).

5. Add the chorizo to the bowl with the onion mixture and then add in toasted bread. Toss together until well mixed.

6. Add chicken stock, beaten eggs and parsley to the bowl and mix well. Season once more with salt and pepper.

7. Dish stuffing mixture into prepared baking dish and bake until browned at the top (about 40-45 minutes).  Serve warm.


Acorn Squash with Brown Sugar Glaze


What better way to find out how to use products in cooking than asking the producers themselves? We spoke to siblings Ken and Toan about their sauces and glazes and loved how they merged East and West in inventive ways. Since I’m a sucker for all roasted squash, I was excited to try their suggestion of basting the squash with their brown sugar glaze. I decided to add some texture with some fried sage leaves as a hark back to my Italian grandmother who always threw a bunch into the pan no matter what she was frying. The slight crunch and nutty flavor balanced perfectly with the sweetness and soft texture of the squash.


Acorn Squash with Brown Sugar Glaze

Ingredients:

1 acorn squash

1 bottle Brown Sugar Ginger Glaze

Butter

Salt and freshly ground pepper

Sage leaves (optional)


Method:

1. Preheat oven to 350° F.

2. Deseed squash, slice in half and then into long slices.
3. Lay slices flat on a baking sheet covered in aluminum foil.
4. Add a pat of butter on each piece
5. Brush on Sweet Ginger Glaze and season with salt and pepper.
6. Roast for 30 minutes, check for doneness by color or poke with fork for softness.

7. Brush once more with ginger glaze and return to oven for another 10 minutes.

8. In a frying pan, heat 2 tablespoons of butter until it begins to foam. Add a handful of sage leaves and fry til crispy.
6) Remove squash from oven and sprinkle with fried sage leaves. Serve warm.

Honey Cake


Rosh Hashanah marks the start of the new Jewish year. We make honey cake not only because it is delicious but also because it bodes well for a “sweet year” and what better way to dish up those blessings on to those we love than a rich, honey filled cake. This recipe is taken from Judy Bart Kancigor’s “Cooking Jewish,” a book my father kindly sent to me when I was finishing my conversion to Judaism. It is a wonderful resource of family recipes and I use it as my go-to for major holidays. By adding Catskill Provisions’ Fall honey to the cake it adds the perfect sweetness and also holds up to the coffee, fruit zests and other Fall flavors like cinnamon and nutmeg. This cake is extremely aromatic and is best dished up with a hot cup of tea or coffee.


Another fun part of Rosh Hashanah, is casting off your sins. If you see groups of Jewish people along the water this September, you’ll now know what they are doing. For Rosh Hashanah, Tashlich is a tradition where you throw bread into the water to symbolize you casting off the sins of the year.  I always love to take a couple slices to the Hudson and slowly absolve my sins by feeding any seagulls or ducks I can find. Almost like a scapegoat, these ducks eat my sins and swim away, making it a very cathartic experience.


So, Rosh Hashanah is really a beautiful holiday where you take stock of the year and get ready to start anew. My family eats this cake the morning of Rosh Hashanah for a sweet start to the day. I hope you’ll enjoy it as well!


Honey Cake

Source: “Cooking Jewish” by Judy Bart Kancigor (Workman) 

www.cookingjewish.com

Ingredients:

2 1/2 cups all purpose flour plus extra for dusting the pan

2 teaspoons baking powder

1/2 teaspoon baking soda

1 teaspoon ground cinnamon

1/2 teaspoon ground ginger

1/2 teaspoon ground cloves

1/2 teaspoon salt

1/4 cup vegetable oil plus extra for greasing the pan

1 cup sugar

1 cup honey

2 large eggs, separated

Grated zest of 1 lemon

Grated zest of 1 orange

1 cup strong brewed coffee, cooled to room temperature (the coffee really influences the taste so use one you love)

1/2 cup walnut pieces, toasted

Powdered sugar for dusting once cake is cooled, optional


Method:

1. Preheat the oven to 325° F. Grease a 9×5″ loaf pan (I doubled the recipe to fit into a massive cake pan but the resulting cake was immense – true family style), dust with flour and tap out the excess.

2. In a medium bowl, whisk the flour, baking powder, baking soda, cinnamon, ginger, cloves and salt together and then set aside.

3. In a large bowl with an electric mixer, blend the oil, sugar, honey, egg yolks and zests on medium speed until thick and well blended (about 3 minutes).

4. Reduce the blender speed to low and add one third of the flour mixture. Next add half the coffee. Alternate between the remaining thirds of flour and the last half of coffee, ending with the flour.

5. Stir the toasted walnuts into the batter.

6. Using a clean bowl, beat the egg whites on medium-high speed until stiff peaks form (1- 1 1/2 minutes). Stir one fourth of the egg whites into the batter to lighten it. Then add the remaining whites in three additions folding them in until incorporated.

7. Scrape the batter into the prepared loaf pan and bake in the center of the oven until the cake springs back when lightly touched and a cake tester inserted in the center comes out clean (about 1 hour and 10 minutes). Set on a wire rack to cool for 15 minutes.

8. Run a knife around the edges and turn the loaf out. Return it to the rack to cool completely.

9. Cut the cake into slices and serve with coffee or tea. This cake also goes extraordinarily well with poached pears and cream as a topping for a more decadent dessert.


Potato, Pancetta and Leek Gratin


Easter is a big deal in England. The whole country pretty much shuts down on Good Friday and Easter Monday and it’s still strange for me, after 14 years in America, to see that most people work on those days. For the non religious, Easter in England is a bit like Thanksgiving. It’s about family and food without all the stress of buying gifts.


I’m very lucky to have an adopted family in America who always include me in their Easter Sunday lunch. The same large, generous family that I spend Thanksgiving with and it’s one of the days I look forward to most in the year. I remember one Easter Lolly bought kits for us all to make Ukrainian Easter eggs (Pysanky). You use wax to create designs a bit like batik. I still have mine displayed in my bedroom as the only thing I’ve ever made that I’m not utterly ashamed of. I really recommend giving them a try and supporting Ukraine in the process – I wish we were selling the kits on Many Kitchens. A thought for next year! For now, you can find the kits here.


Though I’m not going to be doing the cooking this Easter, I wanted to suggest a recipe that is my go-to for large parties and the perfect side dish to an Easter Ham. Pair those two with a simple salad mixed with an all natural vinaigrette and you have a delicious meal which can be made completely ahead of time so you can join in the Easter egg hunt.


Easter Menu:

The Perfect Glazed Ham
Potato, Pancetta and Leek Gratin
 (recipe below)
Mixed Leaf and Greens Salad
Praline Filled Eggs


Potato, Pancetta and Leek Gratin

Serves 8-10

Ingredients:

2 tablespoons of olive oil

8 oz of cubed pancetta

3 large leeks, cleaned and thinly sliced

1 garlic clove, minced

3 cups of heavy cream

2 tablespoons of fresh thyme leaves

3 large Idaho potatoes, peeled and sliced as thin as possible – ideally with a mandolin

Salt and freshly ground pepper


Method:

1. Heat oven to 350 degrees.

2. In a large frying pan, heat olive oil and sauté the pancetta until golden brown – about 8 minutes.

3. With a slotted spoon, remove and drain on paper towels.

4. Add the leeks and garlic to the frying pan and sweat until soft – about 10 minutes.

5. Add the cream and simmer for 5 minutes until fully heated through.

6. Stir in the pancetta, thyme and add salt and pepper to taste.

7. Butter a large ovenproof dish – I used a 10” casserole dish.

8. Arrange a layer of potatoes on the bottom of the dish.

9. Season lightly and then spoon over some of the leek cream mixture and spread evenly.

10. Repeat with remaining potatoes and sauce until all are used – remembering to season the potatoes as you go and finishing the last layer with the sauce.

11. Press down firmly on the potatoes so that the sauce fully covers the potatoes – if it doesn’t, you can add more cream or some milk.

12. Bake until the gratin is golden on top – approximately 1 hour.

Serve with Easter Ham and a Mixed Leaf and Herb Salad (perfect when dressed with Jacqueline and Jerome’s Citron vinaigrette)