The Perfect Glazed Ham


I remember very clearly the first time I went with my friend Sarah Thorowgood to visit her family for the weekend. Sarah’s mother, Sue, had asked if I was one of those people who ‘ate like a sparrow’ and was quickly reassured that was most definitely not the case. I can still picture the family sitting around a large kitchen table and everyone laughing over words that each of them found annoying; ‘pamphlet’, ‘capsule’, ‘foliage’ etc. while Sue carried over the most enormous and delicious looking ham. Ham was not something we ever had at home growing up and my only experience till then was overly salty slabs of ham covered in tinned pineapple – classic 80’s England. I have seriously never had a ham that came close to the one that Sue made that night and has had me searching unsuccessfully for the last 17 years. That was the first of many happy weekends at their house in Berkshire until I moved to America. I remember my last visit and being given Martini glasses by the family for my ‘Sex and the City’ new life that I was embarking on with great trepidation. Would anyone see the humor in the word ‘pamphlet’? Where could I go to play Articulate? My favorite board game first introduced to me by the Thorowgoods and the source of hours of laughter. I’m glad to say that I’ve found all of the above in New York.


But back to that ham. I’ll admit that I never tried to make it myself as I was always slightly intimidated by the idea. It sounded so complicated and I was always unsure of what ham to buy in the stores especially since they all appeared to be precooked or smoked in some way. It wasn’t until recently when we started selling Schaller & Weber that I received a proper education on the different types of hams on the market. As soon as I tasted their Swedish Party Ham, I ran home and emailed Sue for her recipe. Although there were a lot of steps, it wasn’t nearly as complicated or intimidating as I had originally thought. As the ham was in its last stages in the oven, my entire flat was filled with a smell so delicious that it took me right back to the Thorowgoods kitchen all those years ago. We had to photograph it before I was allowed to taste it and the smell was driving me crazy. I couldn’t wait to find out if it tasted as good as it smelt and looked. It did!


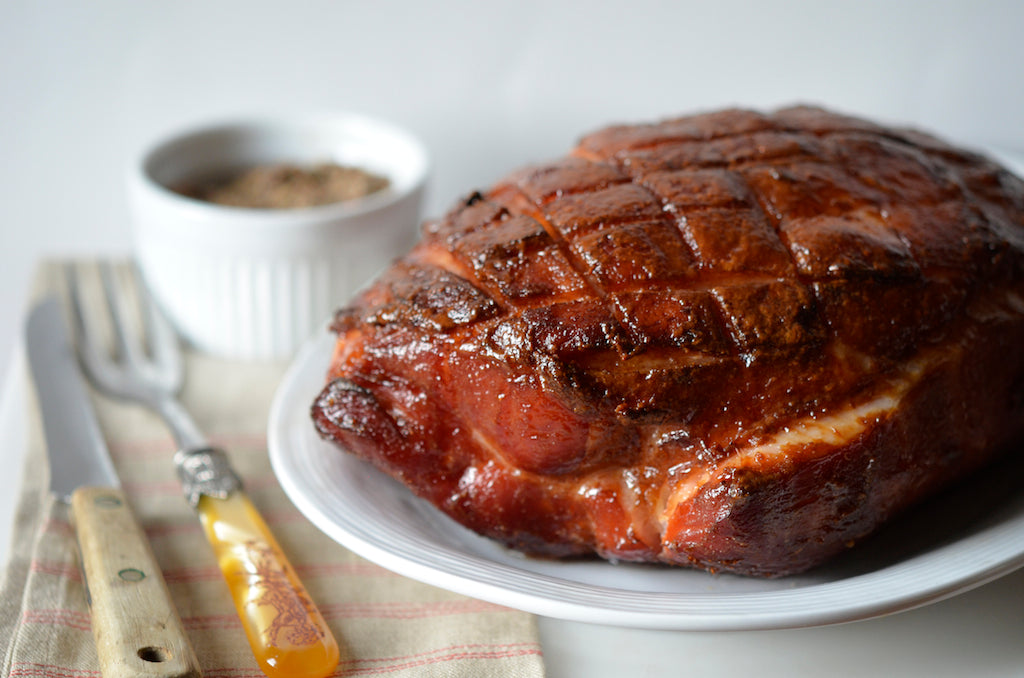
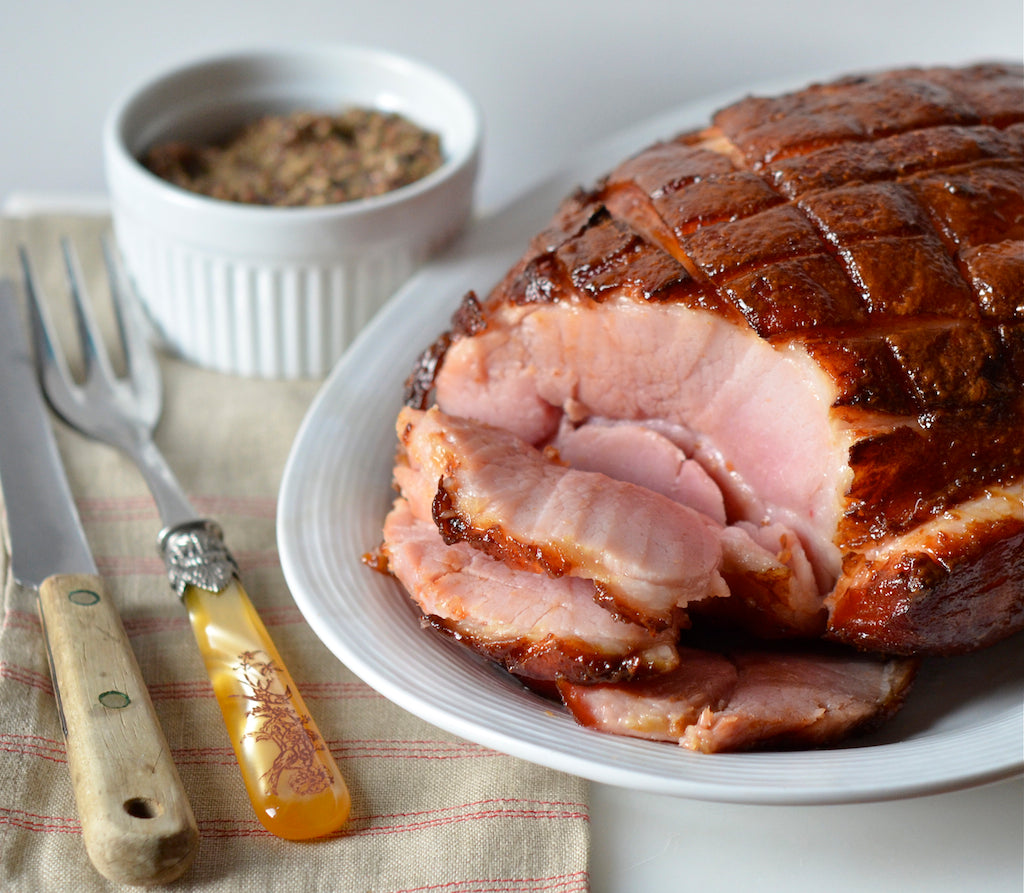
What makes this recipe so delicious is how juicy the ham stays – you can almost cut it with a butter knife. The glaze is both sweet and salty and for a ham cooking novice like myself, very easy to make a large crowd happy. Getting through 7lbs of ham on your own though is no mean feat even after you’ve packed your friends off with multiple slices. So get ready for a post soon on my favorite ways to use up that delicious leftover ham.


Glazed Ham

Ingredients

1 Swedish Party Ham or Bone-in Holiday Ham– approx. 7.5lbs

2 teaspoons whole black peppercorns

3 large cloves of garlic (sliced)

4 bay leaves


For Glaze

1 cup of dark brown sugar

3 tablespoons of dry mustard powder

3 cloves of finely chopped garlic

Balsamic vinegar


Method

1. Preheat oven to 325 degrees. In a large pot, cover ham with water and bring to a boil – boil for 3 minutes.

2. Discard all the water and cover again with fresh water (this step helps remove excess saltiness from the finished ham).

3. Add peppercorns, garlic and bay leaves.

4. Bring back to the boil and simmer on a low heat, covered for 1 hour.

5. Remove ham from the pot but reserve the water.

6. On a cutting board, place ham flat side down. Remove any tough skin and much of the fat from the top, leaving about 1 inch of fat remaining. Score the remaining fat with shallow diagonal lines creating a diamond pattern.

7. While ham is simmering, prepare the glaze. In a medium bowl, mix all the dry ingredients thoroughly and then very slowly, drop by drop. Add balsamic vinegar, stirring as you go, until you have the consistency of a sticky paste.

8. Coat the whole ham with the glaze and place flat side down in an ovenproof dish.

9. Add about 3 or 4 ladles of the reserved water to the bottom of the dish. (Freeze the remaining water to use for stock and soups)

10. Cook for about an hour or until the surface of the ham is golden brown and the sauce is bubbling.

11. When ready, remove the ham to a cutting board and transfer juice to a saucepan.

12. Reduce the sauce by half (it is ready when it easily coats the back of a spoon). Serve the sauce separately in a gravy boat and pour over carved ham at the table.

NB: I found it very useful to pre-slice my leftovers and freeze in individual bags. That way when I was making a new recipe, I could defrost only what I needed.


Lamb and Chorizo Stew with Royal Corona Beans


I’m so ready for Autumn. I’ve got a bunch of hearty dishes that I want to try, not to mention a beautiful new turquoise coat that it’s been too hot to wear. Today it finally felt like Autumn had arrived so I wanted to post the first of a few dishes that will warm the cockles.


A couple of weeks ago, I finally managed to give a long overdue ‘thank you’ dinner for my “Nightingales” (as in Florence). The Nightingales are three incredible women who nursed me back to health after I had my tonsils removed last year. I won’t go into the gory details but I really needed help and the three of them were absolutely amazing. They rallied a group of friends, sat with me and arranged scheduled visits with strict instructions to the point that our friend Hal renamed them “The Gatekeepers.” This year, during another tough time, I discovered they had all been back in touch with each other to once again work their healing magic.


So how to begin thanking three people who have cared for me like family and feel like sisters? I’m not sure they’ll ever know how grateful I am but I thought an evening with all of us where we weren’t discussing medical issues might be a good start. And what to cook? Selfishly, I wanted to be part of the fun so it had to be something that was all done ahead of time and I’m not brave enough to risk something new. I’m a big believer in having as much as possible ready before guests arrive so you can enjoy the evening too. No last minute flambéing for me! An old classic it would have to be; one that would conveniently let me use up packs of Rancho Gordo beans and Schaller & Weber Chorizo left over from testing.


I’ve been making this Lamb and Chorizo Stew with Royal Corona Beans which I’ve adapted from the Dean & Deluca Cookbook for years and it’s great for a big group and stays true to the Nigel Slater philosophy of a successful dinner having the focus on the people and not the food. A large casserole with a big salad and hunks of bread seems to usually do the trick.


So a big shout out to great friends and friendship which as corny as it sounds are, in my opinion, what make the world go round.


Lamb and Chorizo Stew with Royal Corona Beans

Serves 8

Ingredients:

8 tablespoons of olive oil

3lbs of boneless leg of lamb (ask your butcher to cut it into 1”cubes)

1lb of chorizo cut into 1/2 “ slices – you may need to peel the chorizo first.

2 medium onions, thinly sliced

4 garlic cloves, thinly sliced

2/3 cup of red wine

3 tablespoons of sherry vinegar

1 ½ cups of beef stock

2 cups of canned plum tomatoes

1 teaspoon paprika

3 cups of cooked royal corona beans

1 teaspoon arrow root (optional)


Method:

1. Heat half the oil in a large Dutch oven and sauté the chorizo until it’s brown on both sides.

2. Add the onions and garlic and reduce heat so that they sweat and become translucent.

3. Remove everything from the pan and set aside – I use the lid of the casserole dish upturned next to the stove.

4. Add the rest of the olive oil and heat.

5. Add the lamb in batches and brown thoroughly. Don’t overcrowd the pan as the meat will steam rather than get that nice crust that keeps all the flavor in.

6. As each batch is browned, you can add to the chorizo and onions.

7. When there’s no lamb left, you can put everything back in the pan along with all the juices that have collected.

8. Increase the heat and add the wine and vinegar whilst scraping the bottom of the pan.

9. Add the stock, paprika and tomatoes along with their juices and season.

10. Bring to a slow boil and reduce heat to a simmer.

11. Cover partially and let cook for at least 1 ½ hours.

12. Remove lid and cook until sauce begins to thicken and lamb is tender. Approximately 45 mins.

13. Add beans, stir and heat through.

14. If the sauce is still too thin, add a teaspoon of arrow root dissolved in a little water and bring stew to the boil. This will thicken the sauce in just a few minutes without affecting the flavor.

15. Check for seasoning and serve with French bread and a large salad.


Cooking dried beans:  It is, in fact, one of The Nightingales who taught me how to cook dried beans. Bring the beans to a boil in a large pot of cold water. Add a handful of salt, cover and turn the heat off. Let them soak as long as possible – I did overnight. Rinse the beans and replace with fresh water before bringing to a low simmer and cooking for at least an hour until beans are ready. You can add more salt when you’re cooking and other aromatics.

Bunches & Bunches Ltd. – RED Chicken Tacos


Bunches & Bunches Ltd. – RED Chicken Tacos

Serves 4-6 generously

Ingredients

1.5 pounds boneless skinless chicken (breast and or thigh)

1 jar Bunches & Bunches Red Mole

1 bunch fresh cilantro, roughly chopped

1 lime

queso fresco (cotija or sharp cheddar)

tortillas (corn or flour)

salsa fresca or chefs choice

guacamole

black beans

sliced radishes


Method

1. Preheat oven to 325 degrees.

2. Cut chicken 4-6 like size pieces and season with salt and pepper.

3. In a large sauce pot or Dutch oven brown both sides of chicken.

4. Add Mole and coat all the chicken. Bring the sauce to a boil, cover and place in oven for 40-50 minutes until tender to the fork.

5. Serve with crumbled queso fresco, chopped cilantro, lime wedges, tortillas, black beans, salsa fresca, guacamole and sliced radishes. Enjoy!

Saltimbocca alla Romana


This weekend I found myself craving Saltimbocca. It’s one of my favorite dishes but for some reason, I only ever seem to cook it in Italy. Retail therapy no longer an option, I’ve found that ‘culinary therapy’ works pretty well when in need of cheering up. So I took my taste buds to Italy for the day where I’m always at my happiest; Veal Saltimbocca for lunch and the uber comforting Spaghetti alla Carbonara for dinner (recipe next week).


Veal Saltimbocca

Serves 2


For those of you opposed to veal, you can easily substitute chicken or even turkey but make sure to beat the breasts as thin as you can get them.


Ingredients

2 large veal scallops
2 slices of fontina
4 sage leaves
2 slices of Parma ham
½ cup of all purpose flour
2 tablespoons of Marsala Wine (or white wine if you can’t find Marsala)
1 tablespoon of lemon juice
4 tablespoons of butter
2 toothpicks


Method

1. Pat the veal scallops dry with kitchen towel and then place 2 sage leaves on each scallop.
2. Place a slice of Fontina cheese on top of the sage leaves.
3. Cover each scallop with a slice of Parma ham.
4. Secure with a toothpick.
5. Heat 2 tablespoons of butter over medium heat in a large heavy skillet.
6. When the butter is hot, dredge the veal in flour and shake off any excess.
7. Place veal in the pan, Parma ham side down and cook for 2 minutes.
8. Flip both scallops and cook for another minute.
9. Remove the veal to a plate and keep warm while you make the sauce.
10. Add the remaining 2 tablespoons of butter to the pan along with the Marsala and the lemon juice.
11. Stir and reduce for 1 minute.
12. Pour the sauce over the veal and serve. Don’t forget to remove the toothpicks!

I like to serve them with roasted potatoes and string beans.

Mexican Pulled Beef Tacos


Last week my friends Camille and Josh hosted a dinner for our good friend Henry who was visiting from England. It was one of those perfect evenings when I look around the table and have a silent smug moment about how great my friends and how lucky I am to have them. I helped with the food, and by helped, all I mean is that I brought over the trusted red pot and another of Lolly’s fail proof recipes. It’s one of those meals that I love because the red pot works its magic without anyone having to run around with last minute sauces.


As with the chicken, this can absolutely be made in a regular dutch oven.


Red Pot – Part II
Mexican Pulled Beef Tacos

Serves 6 


Ingredients

2lbs organic beef chuck
2 onions
5 cloves of garlic
2 tablespoons of tomato paste
1 small can of chopped tomatoes
1 tablespoon of cumin
1 chipotle pepper


Method

1. Preheat oven to 350. Generously salt and pepper the meat and place in the red pot
2. Roughly chop the onion and place around the meat
3. Peel the garlic cloves and scatter in the pot
4. Pour water into the pot so it comes 1/4 “ up the sides
5. Mix the tomato paste with the can of tomatoes and the cumin in a bowl and pour over the meat
6. Add the chipotle pepper
7. Cover and cook for 3 hours
8. Remove the meat and shred with two forks
9. While you are shredding the meat, you can reduce the sauce in the pot on the stove top
10. Discard chipotle pepper
11. Return the meat to the pot

Serve with warmed tortillas and Mexican fixings. We had yellow rice and beans, chopped cilantro, cubed avocado and grated cheese along with my highly inauthentic Mexican weakness, sour cream.


Red Pot Chicken


My friend Lolly gives the best presents. I’ll mention something I’ve been searching for in March and somehow she remembers come Christmas and gives me the perfect version of it. I can’t think of a single gift from her that isn’t beloved and used on a regular basis from her painting of my favorite sunset to the pendant I wear almost daily. Up there with the best of them is the affectionately named ‘red pot’ made by Emile Henry (sadly not for sale on Many Kitchens — yet!).


I’m not sure I fully understand the science behind the red pot but I think it has something to do with raised ridges on the inside lid creating more condensation. Any scientists out there? Could that be right? Whatever the reason, miraculously everything I’ve ever made in it comes out perfect. If you don’t have one already- I highly recommend it. Foolproof tools in the kitchen can never be underrated.


Below is one of the ways Lolly taught me to use the red pot that illustrates its magical properties. My favorite kind of recipe – almost zero prep and a heartwarming dish that feeds me for days.


Red Pot Chicken

Ingredients

1 whole chicken (patted dry with paper towels)
1 red pepper, roughly chopped
2 white onions, roughly chopped
2 medium sized carrots, peeled and roughly chopped
2 leeks, roughly chopped (thoroughly clean, remove external layers and discard green portion)
Fresh rosemary (approximately 3 sprigs-remove after cooking)
Salt and pepper 


Method

1. Preheat the oven to 350.
2. Place the chicken in the red pot.
3. Salt and pepper the chicken and arrange the vegetables around it.
4. Cook for 2 hours.


If you lack your own magic red pot a good dutch oven can substitute but I sadly can’t promise the perfect result. Brown the chicken first and then add 2 cups of stock to the dutch oven. That’s pretty much it! When you lift the lid you will be met with a wonderfully juicy, browned chicken swimming in the tastiest of broths. And that’s without using any liquids or any extra fat – magic!


What you do next is up to you. I remove the skin and meat from the bones and put it back in the juices. I then serve with Israeli couscous or just as is. Don’t forget to put the carcass back in the pot after and fill with water and a few more vegetables. Put on the stove and let it boil away until you’ve got perfect stock for risottos, soups etc.


Bangers and Mash


Over the last twelve years, I’ve considered moving back to England a number of times. Each time, my inner Virgo has me putting pen to paper and writing my pros and cons list. Number 2 on the list, right below family and friends, is always sausages. The closest I’ve found to a proper English sausage is from Myers and Keswick; the West Village store that makes me nostalgic for things I didn’t even have growing up. I find myself inexplicably sighing over cleaning products like Persil washing powder, Fairy washing up liquid and even Dettol, a brown disinfectant ubiquitous in 1980’s England.


But back to those bangers. My ultimate comfort food — bangers and mash. All ridiculously simple except for the Onion Marmalade that I insist is dolloped on the top of each plateful and takes hours to make. When my friend Ben moved back to England after 5 years in New York, we convinced our beloved local French restaurant to serve Bangers and Mash to all 60 guests at his leaving party. My offering was the onion marmalade — I think I cried more over all those onions than I did over Ben leaving. The party was a huge hit with the back room of Le Pescadou turned into a British theme park with posters of The Queen on all the walls while we mourned the departure of our good friend.


Whenever I see a jar of something resembling onion marmalade, I buy it and am invariably disappointed. Like goldilocks, I’ve complained of them being too sweet, too salty or too sour. Finding David L. Davis’ stand at a farmer’s market in Norfok, CT, the Vidalia Onion Jam was the first thing I tried from his exhaustive selection. My search was finally over and I never have to shed another tear again (well at least not over onions). I use it on everything from burgers to goat cheese crostini and of course bangers and mash. What a healthy life I lead! Now all I need to find is a sausage to sell on Many Kitchens. As always, email me with suggestions: valentina@manykitchens.com

Antiguan Jerk Chicken Wings


This photo was made with Baron’s Hot Sauce- however that might just blow your head off!
(Jerk Sauce will darken the final color of your wings)


Baron’s International Kitchen’s

Antiguan Jerk Chicken Wings

Serves 6 – 8 (as an appetizer)


Ingredients
3 lbs chicken wings
2 ¼ cups Baron’s International Kitchen Caribbean Marinade (Use either our Mild or Hot Jerk Sauce depending on desired level of spiciness, use chart below to vary heat level).


Method

1. Preheat the oven to 300° F.

2. Marinate wings in 1¼ cups of Caribbean Marinade in a gallon-sized ziploc bag for ½ hour, shaking bag occasionally to redistribute marinade (this can be done the night before).

3. Place the wings on a raised grilling rack so that air can circulate above and below the wings.

4. Cook for 2 hours, turning every 30 minutes, baste to the preferred intensity according to the following chart.


** – This intensity level is only for the most adventurous, many will find this too hot to eat.

Serve as a party or dinner appetizer or while watching your favorite sporting event with friends and family!


SUGGESTED SIDES: raw celery sticks and blue cheese dressing, corn on the cob, potato or macaroni salad