Super Bowl Wings


Let’s just say Val is not the world’s biggest football fan so I took over for this week’s blog. My family is deeply invested in this game. Growing up in Seattle with most of my family hailing from the Pacific Northwest has us gunning for another Seahawks victory. Last year we celebrated my Grandma’s 90th birthday and the Super Bowl win was her favorite gift. I see no reason why Grandma doesn’t deserve another win for 91.


In all honesty though my family takes football pretty seriously (understatement of the year). My husband and I just had our first baby and his very first gift was a Seahawks onesie (size 24 months…I think my family is planning for a dynasty). My husband, the ultimate Giants fan, was none too thrilled with the gift and said it should come in handy for a week when we run out of diapers.


This year our newest little teammate, baby Jack, will be helping me as I lay out the game day spread. Wings are an absolute must at game day. Wings for me have to be crunchy and the sauce has to be plentiful and potent. The wing recipe below is actually an adaptation of White on Rice Couple’s recipe for Sticky Asian Fish Sauce Chicken Wings. We thought it was the perfect sauce as it combined honey, ketchup, chili sauce and fish sauce. With ingredients from four of our amazing small batch producers composing the flavor of these wings you cannot go wrong. We used some tips from Ashley Rodriguez’s (Not Without Salt) recently released cookbook, Date Night In, on how to get those wings super crunchy and low and behold the results were finger licking good. Definitely worthy of game day. Go Seahawks!


Super Bowl Wings

Ingredients:

2 lbs chicken wings and drumsticks

Sea Salt

Olive Oil

Scallions, sliced for garnish


Sauce: (from White on Rice Couple)

1/4 cup Sherry Ketchup

1/4 cup honey

2 tablespoons Spicy Garlic Fish Sauce

2 tablespoons Chili Oil (take out with a fork so you are getting mostly the peppers not oil)

1 lime freshly juiced

1 teaspoon rice wine vinegar


Method:

1. Lay out chicken pieces uncovered on a baking sheet and salt generously. Refrigerate, uncovered, overnight.

2. Preheat oven to 450° F. Lay out the chicken on a rack on top of a baking sheet and brush with olive oil. Bake for 30 minutes.

3. Meanwhile, in a small bowl, combine ingredients for sauce. Once wings have cooked baste once with sauce and return to oven for 5 minutes.

4. Remove wings from oven and baste once more generously with sauce. Garnish with scallions and serve warm with plenty of napkins.

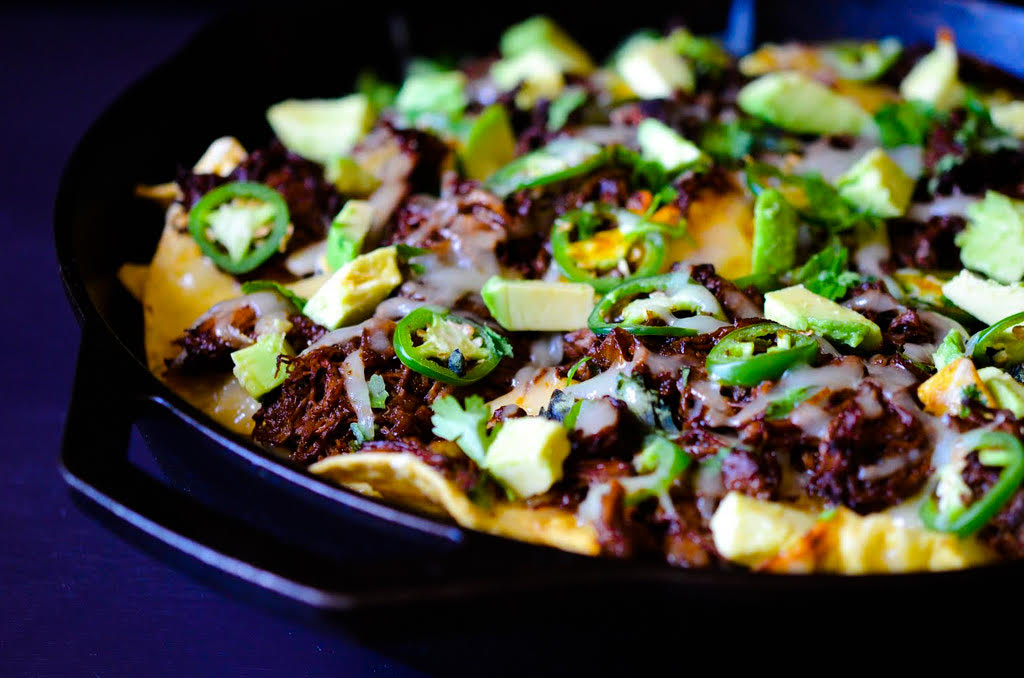
Mole Beef Nachos


Is there such a thing as an original recipe? It’s something I’ve been thinking a lot about recently. The question was asked at a recent panel I attended at the 92nd Y called Food + Media and it seemed that the general consensus was everything’s been done before by someone somewhere; everything’s an adaptation. I would imagine that the likes of Ferran Adrià, Heston Blumenthal and Wylie Dufresne might disagree with their fantastical creations like Ice Cream Curry and reverse spherical olives.


I’m a long way from joining their lofty ranks of molecular gastronomy, but I did stumble upon a culinary combination in the down and dirty Tex Mex world that made me want to eat nothing else for a week. A cursory google search for “Mole Beef Nachos” comes up empty so I’m planting the flag and claiming ownership. That’s quite a big achievement given the amount of time I spent making it, i.e practically none, thanks to Bunches & Bunches incredible Mole sauce. I went for the Smoked Oaxacan Mole this time but I can’t wait to try it with the Red Chilaca Mole!


Mole Beef Nachos

Serves 2 to 4 people (depending on greediness)

Ingredients:

2 lbs of organic beef chuck

Sea salt and freshly ground pepper

2 small onions, coursely chopped

1 jar of Smoked Oaxacan Mole Sauce

1 bag of corn tortilla chips

1 (8 oz block) Monterey Jack or Cheddar cheese, grated

1 jalapeño, thinly sliced


Toppings:

1 avocado, diced

1/4 cup of fresh cilantro leaves

Sour cream, to taste


Method:

1. Preheat the oven to 350°F.

2. Season the meat generously with salt and pepper and place in a large dutch oven.

3. Scatter the onions around the beef and pour the entire jar of mole over the beef. Fill the (now empty) jar with water, shake well and pour over it all over the beef.

4. Cover and cook in the oven for approximately 3 hours. I turned the meat over a few times during cooking but this step isn’t completely necessary.

5. Remove the meat to a board, shred with two forks and return to the pot.

6. To assemble the nachos, fill the bottom of an oven proof dish or cast iron pan with tortilla chips, cover with desired amount of cheese, then add mole beef and scatter with jalapeño slices.

7. Bake in the oven for 10 minutes or until the cheese has melted and then add toppings to your taste.


Easy Dips and Spreads: Camille’s Hummus and Two Tasty Crostini


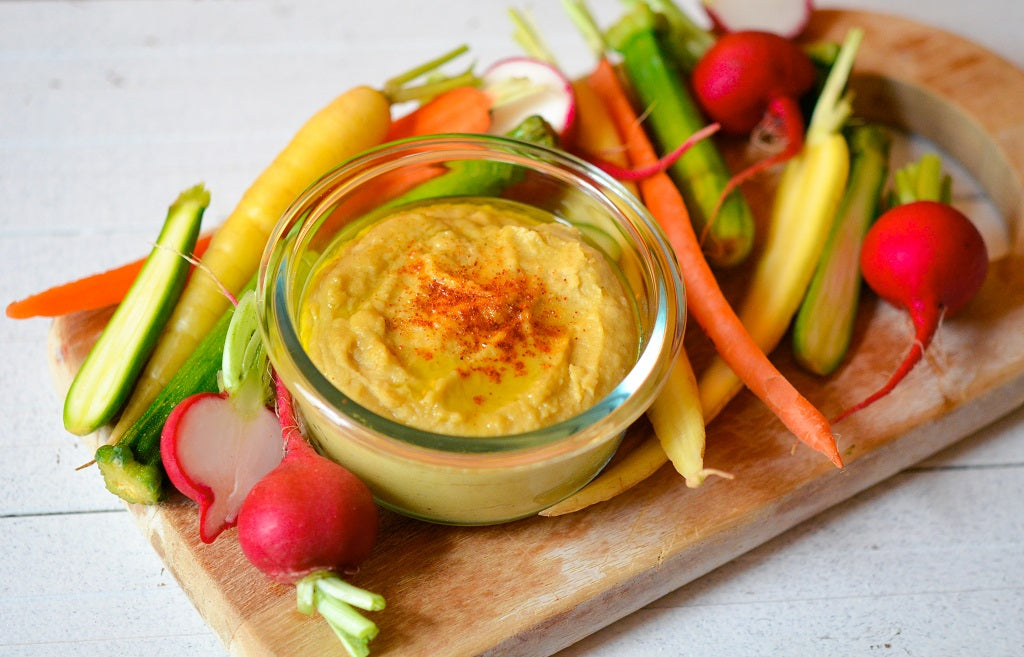
Everyone has their dish. The one they’re known for and have honed to perfection over years, tweaking here and there. Camille’s is hummus  – there’s always a bowl of it on the kitchen counter when I come round and it has ruined store bought hummus for me. There’s a secret to how she gets it so creamy that I’ve never seen in other recipes. She generously shared her much loved recipe with me and therefore all of you.


Another really easy appetizer to add to a party is a variety of crostini. I have a fridge full of jams and spreads and like to mix them with different cheeses on top of toasted slices of baguette. You can toast a whole bunch together on a cookie tray in the oven and if you’re feeling decadent, you can brush them with olive oil first. Two of my favorite that are pictured here are goat cheese topped with Vidalia Onion Jam and ricotta topped with Honey Lemon Lavender Jelly. I’ve always been a sucker for sweet and savory.


Crostini with Ricotta and Honey Lemon Lavender Jelly

Serves 15-20 people

Ingredients:

1 baguette, sliced into 1/4″ slices

3/4 cup of olive oil

1 tub of ricotta (as fresh as can be found)

Salt to taste

1 jar of lavender honey (or even better Mr. Wittle’s Honey Lemon Lavender Jelly)


Method:

1. Preheat oven to 350.

2. Slice the baguette thinly and arrange slices on two cookie trays. You can brush olive oil on both sides if you want but not necessary.

3. Bake until crispy and golden brown (about 15-20 minutes). Turn the trays halfway through baking.

4. Leave crostini to cool.

5. Meanwhile in a medium size bowl mix ricotta with salt to taste. You won’t need more than about 1/2 a teaspoon but it really makes a difference in taste.

6. Spread the ricotta on top of the crostini and top with a spoonful of Honey Lemon Lavender Jam.

7. Enjoy with friends!


Crostini with Goat Cheese and Vidalia Onion Jam

Serves 15-20 people

Ingredients:

1 baguette, sliced into 1/4″ slices

3/4 cup of olive oil

1 log of goat cheese (about 8 oz.)

1 jar of Vidalia Onion Jam (or you can substitute 1/2 cup of caramelized onions)


Method:

1. Preheat oven to 350.

2. Slice the baguette thinly and arrange slices on two cookie trays. You can brush olive oil on both sides if you want but not necessary.

3. Bake until crispy and golden brown (about 15-20 minutes). Turn the trays halfway through baking.

4. Leave crostini to cool.

5. Meanwhile take goat cheese out of the refrigerator to allow it to come to room temperature. This makes it easier to spread.

6. Spread the goat cheese on top of the crostini and top with a spoonful of Vidalia Onion Jam.

7. Enjoy with friends!


Camille’s Hummus

Ingredients:

1 heaped tablespoon of tahini

1 can of chickpeas (including liquid from can)

4 cloves of garlic (peeled)

1 tablespoon of cumin

Juice of 1 lemon

1/4 cup of extra virgin olive oil

Salt to taste

A pinch of paprika (optional)


Method:

1. Take tahini out of the fridge and allow to come to room temperature. Stir if necessary.

2. In a saucepan, heat the chickpeas and garlic along with all the liquid from the can.

3. Simmer on a low heat for approximately 10 minutes.

4. Add all ingredients to a blender (except paprika) and mix until smooth and creamy.

5. Serve in a bowl and sprinkle with a pinch of paprika for color to finish.

Jerk Chicken Skewers


This dish is an easy crowd pleaser. The jerk sauce is a wonderful alternative to a rub and the hot sauce gives a burst of heat and flavor (not for the faint of heart). You can serve as a main course by adding a side of rice or as an easy bbq appetizer!


Jerk Chicken Skewers

Serves 4

Ingredients:

1 lb chicken breast, cut into 1 inch cubes

1 cup Baron’s International Kitchen’s Jerk Sauce

1 yellow bell pepper, cut into 1 inch pieces

1 orange bell pepper, cut into 1 inch pieces

1 large yellow onion, chopped into 1 inch pieces

10 wooden skewers

1 bottle Caribbean Hot Sauce, for dipping (optional, if you don’t like spicy food skip it)


Method:

1) Heat the grill. If gas, heat to high and if using coals, until they glow orange and begin to ash.
2) In a large bowl, marinate chicken and and vegetables. Cover and set in the refrigerator for 1 hour.
3) Meanwhile soak skewers in water.
4) Drain the chicken and vegetables, discarding the excess marinade.
5) Start threading the skewers, alternating between chicken, onion and bell peppers.
6) Arrange skewers on the grill. Grill about 3 minutes per side until chicken is fully cooked.
7) Serve immediately with a bowl of Caribbean Hot Sauce as a dipping sauce.

Chile Rellenos


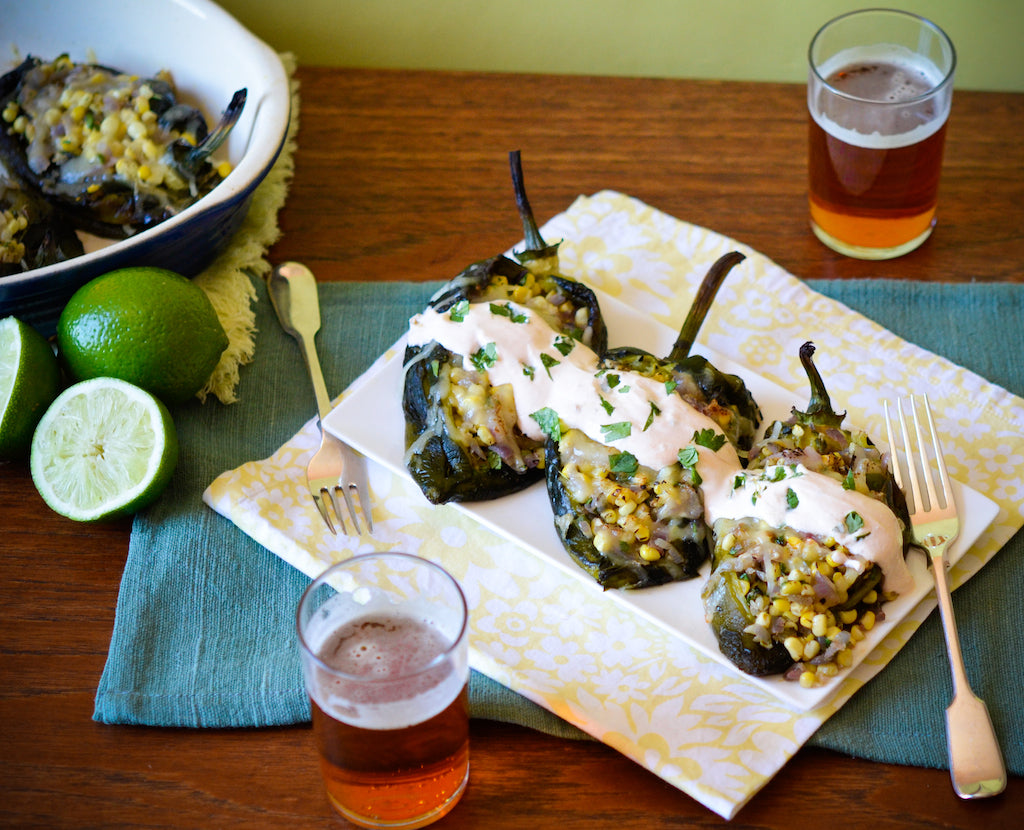
There’s a ‘hole in the wall’ Mexican restaurant around the corner from me that has all of 5 tables and is consistently packed and for very good reason. While not exactly authentic, it’s definitely tasty. Lucky for me, they also deliver. Mexicana Mama has been a long time favorite for their perfect guacamole which is always where I run to when someone’s popping round for a quick drink. When my friend Maria still lived in New York, we had a standing date for Mexicana Mama’s Taco de Puerco and a movie on my sofa. It took me a long time to even try something else on their menu – I’m not great with change.


It’s only recently that I discovered their delicious Chile Rellenos; poblano chile peppers roasted and stuffed with corn and covered in cheese. My new found confidence in the kitchen, thanks to the recent Linguine with Clams success, had me deconstructing my latest delivery and deciding to give it a try in honor of the upcoming Cinco de Mayo. And yet again, I have a new favorite dish! I served it with rice and beans but it could also be a wonderful side dish to Pulled Beef Tacos. It’s a great dish for a dinner party as it can be completely made ahead and finished off in the oven.


Chile Rellenos
Serves 4 as a starter and 2 as a main


Ingredients:
4 poblano peppers
2 tablespoons of olive oil
1 medium red onion (finely diced)
1 jalapeño pepper (finely diced)
4 ears of corn
2 teaspoons of cumin
1 handful of chopped fresh cilantro
1 good squeeze of lime
Salt and freshly ground pepper
1 cup of grated Monterey Jack


Chipotle Lime Crema:
3 tablespoons of sour cream
1 teaspoon of adobo sauce
1 good squeeze of lime juice


Method:
1. Place the poblanos on a cookie tray and broil for about 20 minutes until completely charred. You’ll need to keep turning them as each side is charred.
2. When done, carefully put the poblanos into a brown paper bag and fold down the top to keep the air in. Leave to cool. You can also put in a bowl and cover with plastic wrap. Be careful not to lift from the stalk as you want to keep them as intact as possible.
3. Preheat the oven to 350. Then, in a large skillet, heat the olive oil and gently fry the onion and jalapeño on low heat for about 5 minutes.
4. Cut the corn off the cobs and add to the skillet, turn up the heat and cook for another 5 to 10 minutes until ingredients are  slightly browned.
5. Add the cumin, cilantro, lime juice and stir to mix. Season well with salt and pepper.
6. Remove the peppers onto a board and gently remove the skins – they should peel off easily.
7. Cut each pepper lengthwise making sure not to cut through the other side and then very carefully remove all the seeds with a spoon.
8. Transfer the peppers to an oven proof dish and fill each generously with the corn mixture.
9. Cover each poblano with 1/4 cup of grated cheese and either bake at 350 degrees for 15 minutes. The cheese should be bubbling when ready.
10. Serve immediately with chipotle lime crema.

The Wall and Stuffed Zucchini Flowers


I’m writing this from “the wall” — my favorite spot on earth and where I spend most of every day while in Italy. It overlooks olive groves and vineyards and is covered in our sofa cushions from the early 70’s that are falling apart at the seams but I can’t bear to replace. It’s where I fall asleep reading every afternoon, drink my gin and tonic while watching the sky turns its reds and purples and where, after a little too much wine, two lucky people get to “sit soft” after dinner.


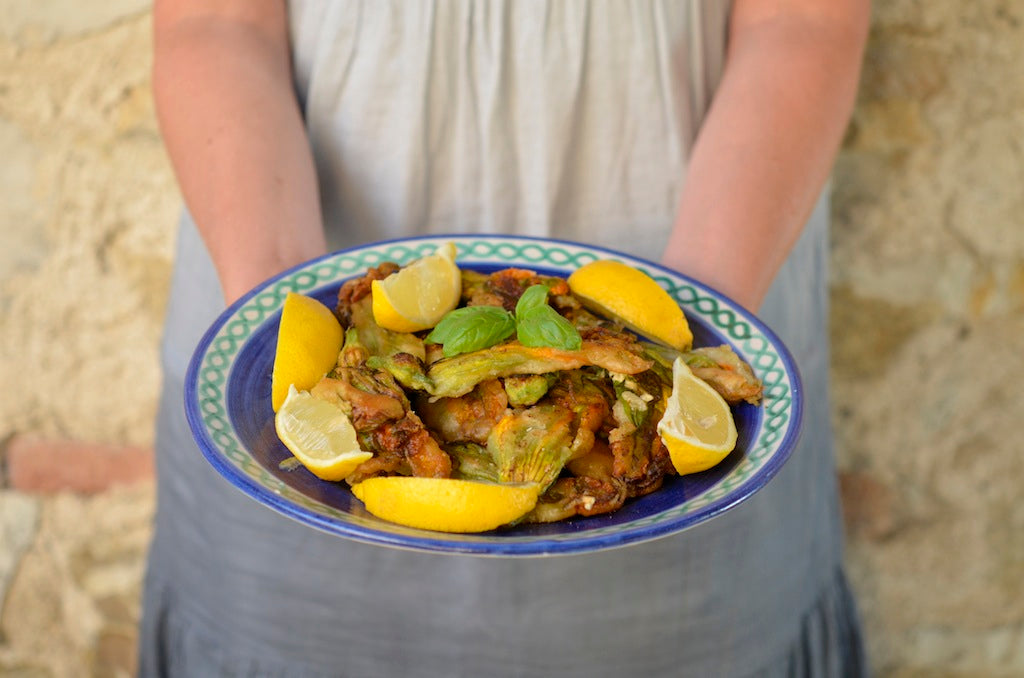
The first couple of days of every vacation are spent getting into what Ben and I call “the zone”. It’s not hard to reach the zone when you’re sitting on this wall listening to the cicadas, watching the sun set and figuring out what you’re going to eat for the next 10 days. I had a brief set back taking me to Zone 5 (the outer boroughs of relaxation) when I drove the car into a ditch on day two and had to have it towed out by a kind Albanian but other than that, the days have been blissfully empty except for our morning trips to the local town to buy supplies and check emails. The menu never seems to change as we exhaust all our favorites and then run out of time to experiment. Top of the list which includes Saltimbocca, Sausage sauce and Bistecca alla Fiorentina is fried Fior di Zucca (zucchini flowers) stuffed with ricotta and basil.


Stuffed Zucchini Flowers

Serves 4 people

Ingredients

16 zucchini flowers

1 1/3 cup of all purpose flour

¼ teaspoon salt

1 ½ cups of beer

½ cup of olive oil

250g ricotta

16 basil leaves

2 lemons


Method

1. Preheat the oven to 180 degrees, Very carefully open each flower and remove the stamen. 2. Season the ricotta with salt and pepper and then also very carefully, insert a heaped teaspoon into each flower along with a basil leaf and twist the leaves to close.

3. In another bowl make the batter by mixing the flour and salt and then whisking in the beer until it’s the consistency of loose pancake batter.

4. Heat oil over a medium heat until a drop of batter sizzles when you drop it in.

5. Holding the stem, dip each flower into the batter and swirl to coat, then drag over the bowl’s edge to remove excess.

6. Add to pan and don’t overcrowd. Be extra careful of hot oil that will splatter. I use a splatter guard after some nasty burns!

7. After 2 minutes or when one side is browned, turn and cook for another 2 minutes.

8. Drain on kitchen towel and keep warm in the oven whilst you do the next batch.

9. When they’re all done, sprinkle with salt and serve with lemon wedges.


Brooklyn Wok Shop’s Spicy Wontons


Spicy Wontons

Ingredients

1 pkg wonton wrappers

1 lb Ground pork

1/2 lb shrimp, peeled and deveined

4 scallions, thinly sliced

1 Egg

3 Tbs Soy Sauce

1 1/2 tsp kosher salt

3/4 tsp white pepper

Chili oil for dipping (nothing beats Brooklyn Wok Shop Chili Oil)


Method

1. Take the shrimp and pulse in a food processor so the shrimp are coarsely chopped.

2. In a medium bowl, add shrimp, ground pork, scallions, soy sauce, salt, white pepper, and eggs and mix well.

3. Dampen the edges of the wonton wrappers and put about a 2 teaspoons of filling in each wrapper.

4. Bring the corners together forming a small satchel and press at the top to seal. (If you like you can find different ways to fold wontons on youtube).

5. Cook in boiling water for 6-8 minutes till cooked.

6. Dress with Brooklyn Wok Shop Chili Oil

*Note: You can make extra and freeze them separately on a tray. When they’re frozen you can put them in a zip top bag. To cook put frozen wontons in boiling water and add 2-3 minutes to the cooking time.

Garden Fresh Bruschetta


My whole life I was led to believe that you could only get good tomatoes in Italy so I studiously avoided them anywhere else. To be fair, English tomatoes in the 70’s were notoriously bad. I can’t remember who first broke the spell and introduced me to my first home grown American tomato but I now can’t wait until they start turning up in farmer’s markets every summer and I can honestly say that they are better than any I’ve ever had in Italy. Top of the list of the best tomatoes I’ve EVER tasted are grown by Sam Butler in his Connecticut garden.


He gets them from Maple Bank Farm in Roxbury, CT where they have been partially raised in a greenhouse.  I’m lucky enough to visit for a weekend every Summer and even able to take a couple of these wonderfully named ‘Big Boys’ home with me.


My only contribution is to make Bruschetta for the Butler family, which as you can see below is ridiculously easy so I’m definitely getting the better end of the deal.


Bruschetta

Ingredients

Good white bread

Garlic

Tomatoes, in season and sun ripened is the best

Olive oil

Salt


Method

1. Toast the bread slices and rub with a little raw garlic.

2. Cover with chopped tomatoes and drizzle with olive oil.

3. Sprinkle a little salt and some basil and then eat!

Quesadillas, Bahamian Style


I try to meet up with my friend Ben at least once a year somewhere fun since we live so far away from each other. Five years ago we spent an idyllic Christmas on Harbour Island and finally decided to return after some misguided attempts by me at winter sports. By misguided I mean that my idea of sports is an energetic game of Ping Pong. I hadn’t skied since my teens and was more than a little terrified but having based my hotel research more on food than quality of slopes, I felt reassured that even if I broke my leg on the first day, at least I would eat well for the rest of the vacation.


Coming from a long line of sun worshippers though, the call of the winter sun was just too strong so a few weeks ago, after what seemed like a brutal winter, we returned to the pink sands and clear blue waters of The Bahamas. Top on my list of reasons to return to Harbour Island were the Lobster Quesadillas at Sip Sip. It’s rare that after 5 years of craving a particular food, the reality lives up to the memory. In this case, they were actually better than I remembered! There’s something very comforting about returning to a place you’ve been before and knowing the lay of the land, even bumping into some locals that we had made friends with on our last visit as well as making new ones. It was a perfect vacation.


On my return to New York, with the snow falling outside, I tried to recreate those Quesadillas in the hope that they would transport me back to the slow bliss of Island life. It was a little hard to replace the grey sleet falling outside with the bright glare coming off the Caribbean Sea so I actually closed my eyes on the first bite and imagined that the cars outside my window were the waves lapping the shore. It almost worked until a siren came roaring down my street and rudely brought me back to reality.


So here are a few photos from Briland (as we learnt to call it) as well as my slightly more economical version of Sip Sip’s famous Quesadilla.


 The Landing Hotel


The Pigly Wigly where we stocked up on snacks for our sundowners!


Sunset from our balcony at The Landing.


One of the many art galleries on Harbour Island.


The View from the infamous Sip Sip.


Without a shadow of a doubt, the best photo of me ever taken. Thanks Ben!


Sip Sip’s board promoting the crown jewels.


The original Lobster Quesadilla (almost) big enough for two.


Shrimp Quesadilla

Serves 1-2


Quesadilla

Ingredients

½ lb cooked shrimp
2 flour tortillas
½ cup of grated Jack cheese
½ cup of grated sharp cheddar cheese
Small bunch of scallions finely chopped
1 yellow pepper finely diced
1 red pepper finely diced


Chipotle Lime Crema 

Ingredients

1/3 cup of sour cream
1 teaspoon of chipotle sauce
1 generous squeeze of lime juice


Method

1. In a large non stick frying pan heat a little butter or olive oil on a medium flame.
2. Place one tortilla in the pan and cover with shrimp, grated cheese and the white part of the spring onions.
3. Place the second tortilla on top of the cheese and shrimp.
4. Leave for a few minutes until the bottom tortilla has started to brown.
5. Using 2 spatulas, flip the quesadilla and brown the other side.
6. Transfer onto a cutting board and cut into 4 wedges.
7. Once on a plate, garnish with the diced peppers and green portion of the spring onions.
8. Mix all the ingredients for the lime crema and drizzle over the quesadilla before serving.


Tamarind and Sumac Date Chutney


Last week I was fortunate enough to have lunch with Louisa Shafia, the woman behind Lucid Food and the author of the upcoming The New Persian Kitchen.


I was excited to tell her about Lezzet Spices and their wonderful Sumac which is so prevalent in Persian cooking and often used by Louisa. Having just come from a meeting with her agent, she had a galley of her gorgeous new cookbook with her so I got a little sneek peek.  I’ve already preordered my copy and you can too:

BarnesandNoble.com,
Powells.com,
IndieBound.org,
Amazon.com.


Louisa has also kindly donated a recipe to Many Kitchens featuring sumac which looks delicious!


Tamarind and Sumac Date Chutney
The New Persian Kitchen
Louisa Shafia


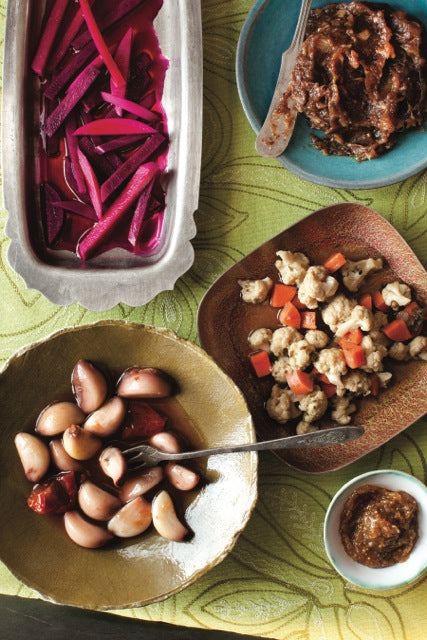
This sublime condiment brings together tamarind, lime, ginger, cinnamon, and sugary dates. Once pickled in the tamarind, the dates crystallize and dissolve into a soft paste similar to a chutney. After 6 weeks, the pronounced salty flavor of the sumac will mellow, and you can enjoy this fragrant pickle on everything from burgers to fish to cheese. For an easy hors d’oeuvre, spread it on a cracker and top it with lime powder–seasoned grilled shrimp and a fresh green herb. The chutney will separate slightly over time, so stir it from the bottom before serving to bring out all its tart lime goodness.


Tamarind and Sumac Date Chutney

Makes about 3 cups

Ingredients

1 cup Thai tamarind concentrate, strained to remove grit

1/3 cup freshly squeezed lime juice, plus more if needed

2 tablespoons sumac

1 teaspoon kosher salt

2 cloves garlic, minced

1-inch piece fresh ginger, peeled and minced

1/2 teaspoon ground cinnamon

1 pound Medjool dates, pitted


Method

1. In a large bowl, whisk the tamarind with the lime juice, sumac, kosher salt, garlic, ginger, and cinnamon. Add the dates and toss well.

2. Transfer the mixture to a clean glass jar and add more lime juice as needed to cover any exposed dates.

3. Seal and store in the refrigerator.

4. Shake every few days to break up the crystallization. The dates will be ready to eat in 6 weeks and will last for about 6 months in the refrigerator.

Reprinted with permission from The New Persian Kitchen by Louisa Shafia, copyright © 2013. Published by Ten Speed Press, a division of Random House, Inc.

Food Photography credit: Sara Remington © 2013