Orecchiette with Broccoli

Share on FacebookTweet about this on TwitterPin on Pinterest


For one week a year, I get to see all my international publishing friends. At the end of May each year, publishers and booksellers flock to New York for the annual Book Expo. The difference now is that I get to avoid the cacophonous Javits Center and just enjoy seeing my old publishing pals at fun dinners. The highlight of my week was a seven course tasting menu at Sushi Nakazawa. For those of you who have seen the incredible documentary Jiro Dreams of Sushi, you may remember Jiro’s apprentice who labors for months perfecting his tamago sushi (egg sushi). That same apprentice, Daisuke Nakazawa, moved to New York and opened his eponomous restaurant in the West Village and I’ve been dying to go ever since.


Each year, I try to find the perfect place to take my friend Andrea from Switzerland. This year, the stakes were high as she was introducing me to her fiancé Hannes. Sushi Nakazawa did not disappoint; each spectacular course was paired with a new sake followed by the grand finale of his now famous tamago sushi. There’s a formality, authenticity and simplicity to the food that is utterly Japanese and made me miss Tokyo and the single mindedness of each eatery.


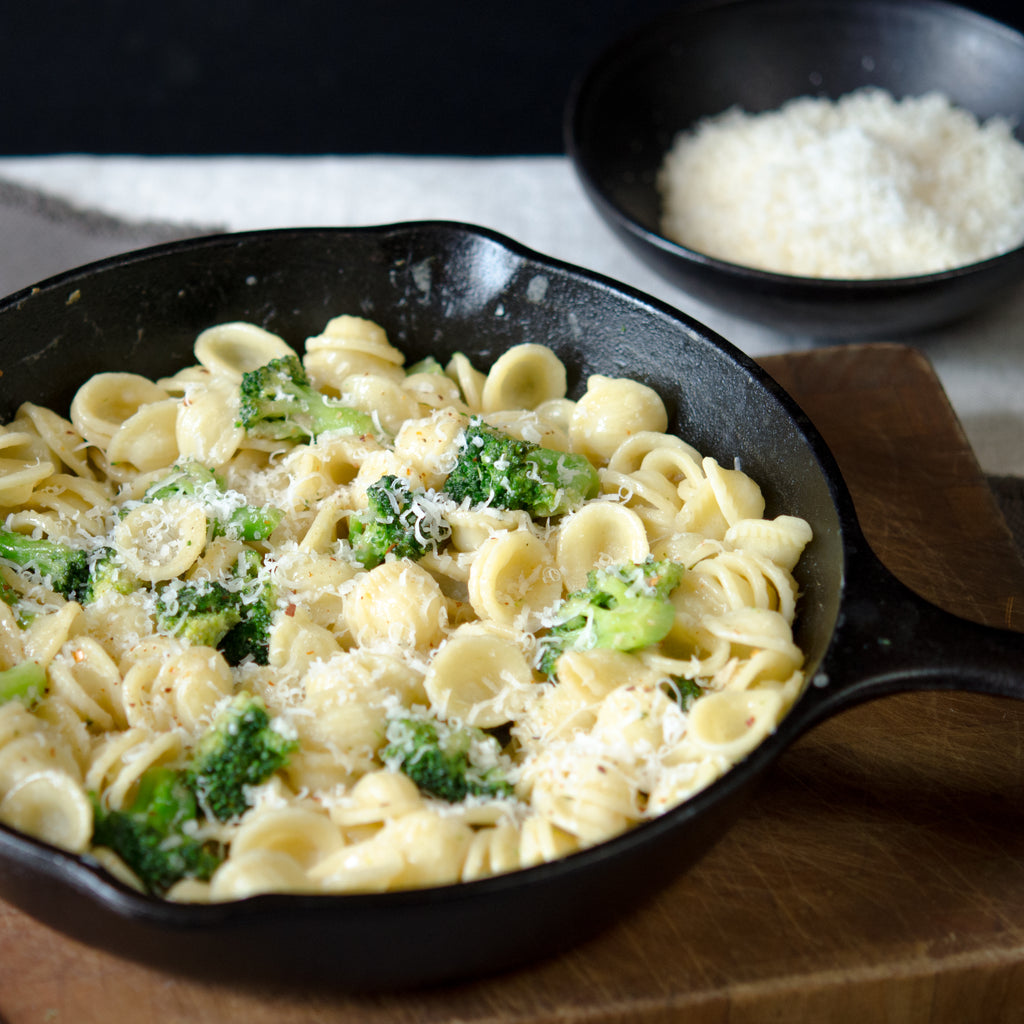
The fair ended, my friends left and the rain set in. I craved a night on the sofa with a bowl of my favorite comfort food and a good book. I turned to one of my staples that I have bizarrely never shared on this blog. It’s the one dish where I always have every ingredient on hand and never need to leave home to satisfy a craving. It even includes a green vegetable to feel vaguely virtuous. Less so when washed down with a gin and tonic with Haber’s tasty tonic!


Orecchiette with Broccoli

Serves 2

Ingredients:

1/2 lb orecchiette

3 anchovy fillets

1 clove garlic (peeled)

2 tablespoons olive oil

1 cup of broccoli florets (fresh or frozen work just as well)

crushed red pepper

1 tablespoon butter

freshly grated parmesan or pecorino cheese


Method:

1. Bring a large pot of salted water to the boil and start cooking the pasta.

2. In a pestle and mortar, crush the anchovy and garlic to a paste.

3. Heat the olive oil in a frying pan and add the anchovy garlic paste on a low heat. Next add, the broccoli, some red pepper flakes and continue cooking and stirring for 4-5 minutes.

4. Just before you drain the pasta, remove a cup of the boiling water for later use.

5. Add the drained pasta to the frying pan. Stir well and add the butter and a handful of grated cheese. If too dry, add some of the reserved water.

Chicken and Chorizo with Brown Rice

Share on FacebookTweet about this on TwitterPin on Pinterest


I first found this recipe in my favorite weekly magazine, The Week. It had the best subtitle for any recipe I think I’ve ever seen. “Brown Rice – Not just for hippies anymore!”, it proclaimed. This was about 15 years ago and before brown rice was ubiquitous. The recipe is a great take on Arroz con Pollo and the rice gives a nuttiness to the whole dish that goes so perfectly with the smokiness of the chorizo and the sweetness of the red peppers. I’m a big lover of one pot meals not just for their convenience but for the way all the flavors meld after being cooked together.


Arroz con Pollo y Chorizo

Serves 6 

Ingredients:

3 red peppers

2 tablespoons extra virgin olive oil

6 bone-in, skin-on chicken thighs

3 chorizo links (about 3/4lb), sliced

1 onion, halved lengthwise and thinly sliced

3 cloves of garlic, thinly sliced

1 tablespoon of dried oregano

1 teaspoon of red pepper flakes

1 1/2 cups of brown rice

1/2 cup of white wine

3 cups of chicken broth

Chopped fresh parsley for serving


Method:

1. Cut peppers in half lengthwise, remove seeds and lay flat (skin side up) on a foil lined baking tray.

2. Broil until skin is completely charred, then set aside to cool. Once cooled, remove charred skin and slice into strips.

3. Preheat oven to 400 °F.

4. In a large dutch oven, heat oil on medium high.

5. Season the chicken thighs and add skin side down. Leave them unturned for 10-12 minutes until the skin is brown and crispy. If they do not all fit, you can cook them in batches. Remove the chicken to a plate.

6. Next add the chorizo and cook until browned all over, stirring frequently; about 5 minutes. Remove to the plate with the chicken using a slotted spoon.

7. Add the onion, garlic, oregano and red pepper flakes to the oil and fry until slightly browned; about 8 minutes.

8. Add the brown rice to the onion mixture and coat well with the oil. Fry for about 2 minutes until the rice is glossy.

9. Add the wine and bring to a boil and scrape the bottom of the pan to release all the yummy juices from the meat. Cook for about 1 minute until the wine has almost evaporated.

10. Add back the chicken (skin side up), chorizo and roasted pepper strips and then pour over the broth.

11. Bring to a simmer, cover and bake in the oven for about 1 hour and 15 minutes. Check after 40 minutes to make sure that all the liquid hasn’t evaporated. You can add a bit more water if needed. It’s ready when the rice is cooked through.

12. Sprinkle with parsley and serve straight from the pot.

Crème Brûlée

Share on FacebookTweet about this on TwitterPin on Pinterest


My absolutely favorite kitchen tool is also the one I use least. As crazy as it sounds, just having a torch makes me feel confident in the kitchen and lighting it up makes me feel like a pro. Crème Brûlée looks so much more impressive than it is. It’s pretty foolproof and so fun to make. The minute I got samples of La Canne’s incredible sugars, I knew exactly how I wanted to use them. The Smoked Pecan flavor made the perfect crackly crust to a silky smooth custard below.


Crème Brûlée 

Serves 8

Ingredients:

4 cups of chilled heavy cream (divided)

2/3 cup granulated sugar

1 vanilla bean (split lengthwise and seeds scraped out)

12 large egg yolks (freeze the whites for another use)

8 heaped teaspoons of Pecan Smoked Sugar


Special Equipment:

8 ramekins (about 4 or 5oz)

1 culinary torch


Method:

1. Heat oven to 300°F.

2. In a medium saucepan, heat 2 cups of the cream, sugar and vanilla seeds as well as the pod. Stir well and bring to a boil. Once it’s come to a boil, turn the heat off and let the mixture steep for about 15 minutes.

3.Stir the remaining 2 cups of cream into the mixture, stir well and remove the vanilla pod.

4. Line a large roasting pan that will fit all the ramekins with a kitchen towel. Arrange the ramekins on the towel. Bring a kettle of water to the boil.

5. In a large bowl, whisk the egg yolks until combined. Whisk in about a cup of the cream mixture until combined. Repeat with a cup each time until all the mixture is combined with the yolks and looks evenly colored.

6. Evenly divide the mixture between the ramekins and carefully place the baking dish on the rack in the oven. Then very carefully pour boiling water into the pan, making sure not to get any in the ramekins. Keep adding until the water is half way up the ramekins.

7. Bake until the custard have just set; about 30 minutes.

8. Transfer the ramekins to a wire rack and bring to room temperature; about an hour. Cover with plastic wrap and refrigerate until cold. At this point, you can leave them for up to 4 days.

9. When you’re ready, uncover the ramekins and blot any condensation with a paper towel. Sprinkle each ramekin with a heaped teaspoon of Smoked Pecan Sugar. Tilt and tap the ramekins to evenly distribute the sugar.

10. Then the fun part. Ignite the torch and burn the sugar until it’s nice and dark. Refrigerate uncovered to set the sugar for about 5-10 minutes but no longer than 40 minutes.


Mother’s Day Sponge Cake

Share on FacebookTweet about this on TwitterPin on Pinterest


Val was kind enough to let me take on this weeks blog post and it is a pretty special one for me. This is my first Mother’s Day as a mom and I still can’t quite believe it. It has been such a wonderful and crazy new step in life and I honestly couldn’t have adapted without the immeasurable help of my own mother.


I have always been close with my mother but now I understand her more too. Motherhood isn’t glamorous. True there is nothing better than holding a sleeping baby that snuggles into you and wakes with a smile but that same love bug still spits up all over your clothes at least once a day. Not to mention all that I put my mother through in my long adolescence. It dawned on me when I called her a couple weeks ago needing to talk, I’m a 32 year old who still needs her mom. I started laughing imagining my son calling for help in his 30’s. That’s commitment. This is the long haul and I am finally starting to understand the depth of motherly love.


This Mother’s Day I wanted to celebrate with a cake. We aren’t the best bakers in our family so when we get a good recipe we treasure it. My mom made this cake on her last visit. It was one of two layer cakes she made in one week, which gives you the faintest clue of the obsessive and overwhelming love of motherhood. The sponge cake was incredibly light and fluffy and each layer was bright and beautiful so that the affect was like opening a present. The recipe just felt special and seemed the perfect tribute to the day. I hope you enjoy it and happy Mother’s Day to all!


Mother’s Day Sponge Cake

Ingredients:

3/4 cup sugar

6 oz. butter, softened

3 large eggs, brought to almost room temp.

1 teaspoon vanilla extract

1 cup self rising flour

1-2 tablespoons vanilla almond milk (you can substitute regular milk if you prefer)

5 tablespoons lemon curd

5 tablespoons strawberry jam


Icing:

1/2 pint heavy cream

1 cup powdered sugar

1 teaspoon vanilla extract


Method:

1. Preheat oven to 350° F. Grease two 8″ non-stick cake pans and bring your eggs out of the refrigerator in advance so they are not so cool when added.

2. Whip your sugar and butter using a stand/hand held mixer until consistency is smooth. Then add in your eggs one at a time until the mixture is glossy and smooth like mousse. Finish by mixing in vanilla.

3. Fold in your flour, stirring gently till just mixed. Finish by adding milk. Start by adding 1 tablespoon of milk and add an addition if needed to make mixture smooth and able to drop easily from the spoon to the cake pan.

4. Divide batter between the two cake pans and bake in the center of the oven for 15 minutes.

5. Once cake has cooked, remove to cool on a wire rack.

6. Meanwhile, mix all icing ingredients in a large bowl with an electric mixer. Whip till soft peaks form and remain when you gently pull away the beaters.

7. To finish the cake, lay your first layer of sponge cake on your serving platter. Top with lemon curd, making sure to spread evenly as a layer. Next add your strawberry jam, again spreading evenly.

8. Place your final sponge layer on and begin icing cake. You will have extra whipped cream icing but its always better to have to much than too little. Enjoy!


Note: This cake is best the day it is made, that is when the sponge is freshest and the whipped cream icing the best.

Agua Frescas

Share on FacebookTweet about this on TwitterPin on Pinterest


I have definitely been overindulging recently. The excitement of sunny days has brought everyone out of hibernation and as a result, it’s been a very social few weeks. Yesterday morning, after hosting my bookclub, I craved something clean, fresh and most importantly, thirst quenching! I wanted to gear up for Cinco de Mayo without mixing margaritas or frying tortillas. Agua Frescas, the most refreshing and tasty drinks imaginable, were the perfect antidote to my late nights.


Watermelon Agua Fresca

Serves 4

Ingredients:

5 cups of fresh, ripe watermelon, seeds removed

1/4 cup lemon juice

1 cup water

1-2 tablespoons agave nectar for sweetening, optional


Method:

1. In a blender on high, add watermelon and lemon juice and puree till smooth.

2. Strain juice over a mesh sieve into another bowl.

3. Add in water and refrigerate. This can be made a day in advance. Be sure to shake before serving.


Cantaloupe and Mint Agua Fresca

Serves 4

Ingredients:

5 cups of fresh, ripe cantaloupe, seeds removed

1/4 cup lemon juice

1/4 cup fresh mint leaves, not packed (just a small handful)

1 cup water

2-3 tablespoons agave nectar for sweetening, optional


Method:

1. In a blender on high, add cantaloupe and lemon juice and puree till smooth. Next add in mint leaves and pulse till incorporated.

2. Strain juice over a mesh sieve into another bowl.

3. Add in water and agave nectar to taste then refrigerate. This can be made a day in advance. Be sure to shake before serving.

My Ultimate Breakfast Sandwich

Share on FacebookTweet about this on TwitterPin on Pinterest


When I first moved to New York I was obsessed with Eggs Benedict. Ben and I would scour NY every weekend in search of the ultimate version. We had a complicated scoring system that involved heavy weighting on runniness of yolk, crispiness of muffin and had a lighter weighting for side dishes, music, friendliness of waiters etc. Many a Sunday morning was spent pondering how many eggs were being cracked across the 5 boroughs as we filled our score cards. Back then our favorite was Cafe Mogador in the East Village. Ben even went so far as to contact a man he found online who had his own Eggs Benedict blog, convinced that he had found my soul mate. Closer inspection showed that he had several other blogs devoted to devil worshiping and that perhaps a mutual love of poached eggs on a muffin might not be the basis for a lasting relationship. 


That was 15 years ago and the breakfast sandwich has evolved a great deal. Nowadays, you’re more likely to see Avocado toast on a NY brunch menu than Eggs Benedict. Back then, the only place you could find it was Cafe Gitane – now it’s ubiquitous in restaurants (as well as on blogs). I was a late adopter but am now a fully fledged, card holding member of the Avocado brigade and have been perfecting my own breakfast version for a while now.


Breakfast Sandwich

Ingredients:

2 pieces of 7 grain bread, toasted

2 tablespoons of Chili Butter

1/2 avocado

1 slice of prosciutto

1 tablespoon olive oil

1 egg

Large flake sea salt


Method:

1. Spread your chili butter on top of both of your slices of toast. Next, smash your avocado with a fork onto one of the slices of toast. Lay your slice of prosciutto on top of the smashed avocado.

2. Next, heat your olive oil in a small frying pan. Once oil is hot, add egg and fry until the sides are nice and crunchy and the yolk is just cooked but still runny. I like to tip the pan and using a spoon, collect some of the hot oil and pour over the egg white so it cooks on top.

3. Place your egg on top of the prosciutto and season with sea salt. Top with your remaining slice of toast and enjoy. It’s messy but incredibly delicious.

Piri Piri Chicken

Share on FacebookTweet about this on TwitterPin on Pinterest


This recipe will add some sizzle to your weekday grind. With a choice of red or green piri piri sauce and even a Romesco Sauce for good measure, simply roasted chicken and potatoes turned into a meal that packed a flavorful punch.


Piri Piri Chicken

Serves 4-6

Ingredients:

6 chicken legs

6 chicken thighs

Olive oil for drizzling

Salt and freshly ground pepper

1 jar Green Piri Piri Sauce

1 jar Red Piri Piri Sauce

1 jalapeño, sliced thinly for garnish

1/4 cup washed cilantro leaves as garnish


Method:

1. Preheat your oven to 450° F.

2. Line two baking sheets with parchment paper. On the first sheet, lay down chicken pieces skin side up. Drizzle with olive oil and top with salt and pepper.

3. On your other cookie sheet add your fingerling potatoes. Again drizzle with olive oil and season to taste. Bake for 20 minutes until crispy on outside and tender on the inside.

4. Bake chicken for about 30 minutes until crispy brown and fully cooked.

5. Combine your chicken and potatoes on a serving platter and top with piri piri sauce. The sauce can be a bit spicy so add to your taste.

6. Garnish with sliced jalapeño and cilantro.

Matzo Ball Soup

Share on FacebookTweet about this on TwitterPin on Pinterest


Often called Jewish Penicillin, Matzo Ball Soup is not only a Passover staple but also such a New York  City staple. This recipe was taught to me by my wonderful friend Rachel who swears the secret lies in the dill and the richness of the broth. We’ve made this recipe together for Seder meals and other holidays and it is just delicious and always makes me feel right at home.


The stock can be made in advance to save time. You can freeze your enriched chicken stock or simply make several days in advance and rewarm when ready to serve. Always store your matzo balls separately so they do not become engorged with water and break apart.


Matzo Ball Soup
Ingredients:
1 whole chicken, giblets removed (about 4lbs)
1 yellow onion
1 bunch dill, stems removed then chopped
4 eggs
1/4 cup vegetable oil
1 cup matzo meal (make sure it’s kosher for Passover)
1 (32 oz) carton chicken stock
4 large carrots, cut into bite size pieces
Salt and freshly ground pepper


Method:
1. In a large stockpot, add whole chicken and cover with water. Bring to a boil then reduce to a simmer. Simmer uncovered for one hour.
2. Meanwhile, slice onion in half and dice one half. Set aside in a small bowl for the soup. Take 1/2 of the remaining onion and mince. Set aside for the matzo balls.
3. In a medium bowl, mix egg, vegetable oil and 1/4 cup water. Mix thoroughly then add in matzo meal and mix till smooth. Add in the minced onion, 1/3 of the chopped dill and season with salt and pepper. Mix well then set in the refrigerator for 1/2 hour.
4. Once chicken stock has simmered for an hour, remove chicken to cool into a large bowl. Take your stockpot and place In the freezer.
5. After the fat has chilled on the surface of the stock, skim it off with a spoon and return stock to the stovetop. Add in the carton of chicken stock.
6. Fill another large pot halfway with salted water. Be sure that you have a lid for the pot.
7. Now that chicken has cooled, remove fat and discard. Shred the meat and set aside for the soup. You can save the bones to make another stock later but be sure to at least save one leg bone for your Seder plate.
7. Your matzo balls are ready to be formed! Take a large spoon of batter and roll into a ball. Drop into the pot of boiling salted water. Repeat till you’ve used all your batter. You get extra points if you manage to make an even 18 balls (the number 18 for Jews is a spiritual number that symbolizes the word “chai” meaning life.)
8. Lower boiling water to a simmer and cover and cook matzo for 30 minutes.
9. As your matzo balls are cooking, return your chicken stock to a boil and add in chopped carrots. Cook till just soft (about 10 minutes). Reduce heat again to a simmer and add in chopped onion and remaining dill. Season to taste with salt and pepper.
10. You can move your cooked matzo balls to the soup and serve immediately or store them separately if you are making in advance.
11. Be sure when you serve to ask how many matzo balls your guests want and serve your broth piping hot. Enjoy!

Caramelized Onion and Goat Cheese Tarts

Share on FacebookTweet about this on TwitterPin on Pinterest

I’ve been making these little beauties for so many years that I don’t remember where I first got the recipe. They are so simple to make that you barely need a recipe and you can make a large quantity very easily so they’re a perfect appetizer for a big Easter lunch. It’s all my favorite flavors in one mouthful; flaky pastry, sweet onions and cheese with a little kick. 


Caramelized Onion and Goat Cheese Tarts

Serves 8 as an appetizer


Ingredients: 

2 tablespoons butter

1 tablespoon olive oil

4 red onions, cut lengthwise and sliced thinly

1 tablespoon chopped fresh thyme, plus extra sprigs to save as garnish

Salt 

Frozen puff pastry, defrosted but still cold

1 (8 oz.) log of goat cheese, put in freezer for approximately 30 minutes


Method:

1. Heat oven to 425° F.

2. In a large frying pan, melt the butter and olive oil. Add the onions and thyme and season well.

3. Fry on low heat for 20 – 25 minutes until the onions are soft and caramelized. Then turn the heat off and allow to cool.

4. Cut the pastry into approximately 4″ squares and lay on a cookie tray lined with parchment paper. You will need 8 squares

5. Add a small spoonful of the onion mixture to the center of each square, leaving a small rim of pastry.

6. Slice the goat cheese into 8 slices and put one slice on top of each of the onion tarts.

7. Bake for about 20 minutes or until the pastry has risen and browned.

8. Serve warm with a bed of greens and top with fresh thyme.


Minestrone Soup

Share on FacebookTweet about this on TwitterPin on Pinterest


I left New York for London in the middle of a blizzard and returned to a completely different city. Away go the ubiquitous puffer jackets, away goes the blackened grimy snow that has been piled high for weeks. Out comes the sun and all the happiness that Spring brings after another brutal winter. Back to the farmers’ market I skipped and felt the need for copious vegetables after the excessive comfort foods enjoyed during hibernation. A fresh minestrone topped off with a dollop of pesto really hit the spot.


Minestrone Soup

Ingredients:

3 tablespoon olive oil

2 white onions, peeled and chopped

2 carrots, peeled and chopped

1 leek, washed and sliced

2 celery stalks, chopped

1 bunch of rainbow chard, washed and roughly chopped

2 zucchinis, halved lengthways and sliced thickly

1 handful of spinach, washed and roughly chopped

8 cups of good vegetable stock

1 medium potato, peeled

1 cup of cooked cannellini beans

Salt and freshly ground pepper

Fresh pesto

Parmesan cheese


Method:

1. Heat the olive oil in a large sauce pan, then add the onion and cook for 3-4 minutes.

2. Continue adding the vegetables one at a time, letting each one cook for a minute or 2 before adding the next.

3. When the spinach has been added, season well with salt and add the stock and the potato.

4. Bring the pan to the boil and reduce to a simmer and cook until the potato is quite soft (approximately 20 minutes).

5. Add the cooked beans and remove the potato with a slotted spoon. Smash the potato with a fork and return to the soup to add thickness.

6. Season with salt and pepper and serve topped with a dollop of pesto (or some peppery extra virgin olive oil) and some freshly grated Parmesan cheese.